![]()
How to...
- open a video file
- select video and audio streams
- preview a video clip
- navigate in your video
- set and delete markers
- set fragments to be kept or cut
- fix audio/video synchronization
- start splitting
- start joining
How to open a video file
To open the video file you want to split, do the following:
Select File -> Open Media File... from the menu. The standard Windows Open File dialog will appear.
Find your video file and click Open.

See also Supported file formats, File menu
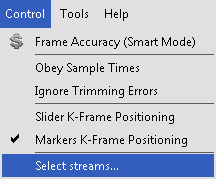
How to select video and audio streams
AVI Trimmer+ allows you to choose the audio and video streams that will be rendered into the final movie. To choose the streams, open the Control menu and follow "Select streams..." menu item.
The special window will be opened. It is possible to select audio and
video streams for the preview and editing here.
You can see this window also after opening of any file with multiple
video or audio streams.
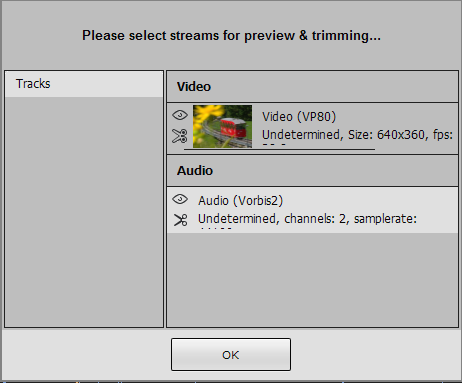
Choose the stream for preview by clicking the icon with an eye
( ). To select streams you want to be present
in the output file click the icon with scissors
(
). To select streams you want to be present
in the output file click the icon with scissors
( ).
).
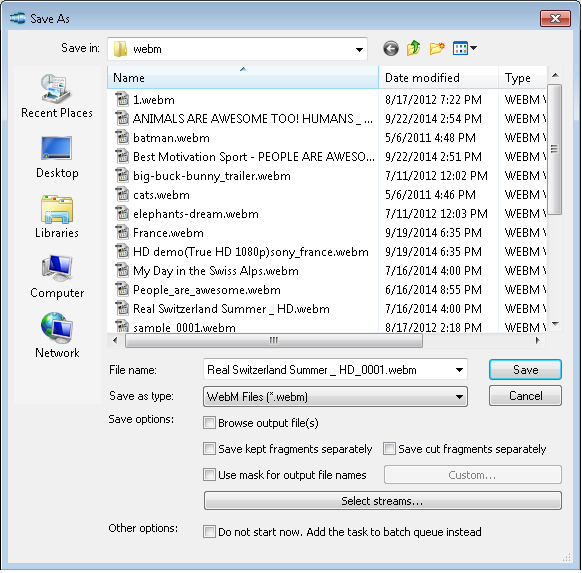
You can also open the stream selection window by clicking the "Select streams.." button from the dialog window that opens after the trimming start.
See also Control menu, Stream selection window
How to preview a video clip
Open a video file
To start playback, click the Play button. Also, you can use the Edit->Play menu item or the Space shortcut key.
To pause playback, click the Pause button. You can use the Edit -> Pause menu item or the Space shortcut key.
| Window element | Description | Shortcut key |
 |
Previous K Frame | Left arrow |
 |
Next K Frame | Right arrow |
 |
Play | Space |
 |
Pause | Space |
 |
Next Frame | Ctrl + Right arrow |
 |
Previous Frame | Ctrl + Left arrow |
See also Navigation controls, Edit menu, Keyboard shortcuts
How to navigate in your video
- To advance to the next K frame, click the Next K Frame button or select the Edit -> Next K Frame menu item from the menu. You can also use the Right arrow shortcut key.
- To jump to the previous K frame, click the Previous K Frame button or select the Edit -> Previous K Frame menu item. The Left arrow shortcut key is also available.
- Left-click the timeline at the position you need.
- Type the necessary time in the edit box in the Navigation controls in the HH:MM:SS.mS format. The position will be automatically adjusted to the nearest previous K frame.
| Window element | Description | Shortcut key |
|
Previous K Frame | Left arrow |
|
Next K Frame | Right arrow |
|
Previous Frame | Ctrl+ Left arrow |
|
Next Frame | Ctrl+ Right arrow |
See also Navigation controls, Edit menu, Control menu, Keyboard shortcuts
How to set and delete markers
To set a new begin marker, do the following:
Navigate to the position where you want to add it.
Press the Add begin marker key (N) or select the Edit -> Add begin marker menu item
To set a new end marker, do the following:
Navigate to the position where you want to add it.
Press the Add end marker key (M) or select the Edit -> Add end marker menu item
To delete a marker:
Left-click the marker you want to delete.
Press Remove marker/fragment key (Delete) or select the Edit -> Remove marker(s) menu item.
To delete all markers from the timeline, select the Edit -> Clear All Markers menu item or use the Ctrl + C shortcut
Note: markers will be deleted without any confirmation
| Window element | Description | Shortcut key |
 |
Add Begin Marker: Add a new marker to the current slider cursor position. | N |
 |
Add End Marker: Add end marker to the current slider cursor position. | M |
See also Edit menu, Keyboard shortcuts, Splitting controls
How to set fragments to be kept or cut
To define a new fragment:
Navigate to the beginning of the future fragment.
Press the Add a begin marker key (N) or select the Edit -> Add Begin Marker menu item.
Navigate to the end of the future fragment.
Press the Add end marker key (M) or select the Edit -> Add End Marker menu item..
To adjust the time of the fragment start and stop:
Select the marker at the beginning/end of the fragment
Drag the marker to the necessry position (or use the the Next K Frame/Previous K Frame buttons)
To delete a fragment:
Left-click the fragment you want to delete.
Press the Remove marker/fragment key (Delete), or select the Edit -> Remove marker(s) menu item.
Note: the fragment will be deleted without any confirmation.
To set a fragment to be kept
Left-click the fragment you want to keep.
Press the Keep On Selected Fragment key (S) or select the Edit -> Keep On Selected Fragment menu item.
To set a fragment to be cut
Left-click the fragment you want to delete.
Press the Cut Off Selected Fragment key (D) or select the Edit -> Cut Off Selected Fragment menu item.
| Window element | Description | Shortcut key |
|
Add Begin Marker: Add a new marker to the current slider cursor position. | N |
|
Add End Marker: Add end marker to the current slider cursor position. | M |
See also Edit menu, Keyboard shortcuts, Splitting contros
How to fix audio/video synchronization
AVI Trimmer+ is designed to split media files without loosing audio/video synchronization. However, some media files lose synchronization after splitting. To avoid losing sync, you can try to do the following:
- Open your video file.
- Define the fragments you want to keep in the final movie.
- Select the Control -> Obey Sample times menu item.
- Continue the splitting process as usual.
See also Control menu, How to set fragments to be kept or cut
How to start joining
Note: the joining feature is supported only in paid product SolveigMM Video Splitter.
To start the joining process:
- Add the video (audio) files you want to join either using drag'n'drop or by clicking the Add Media File(s) button.
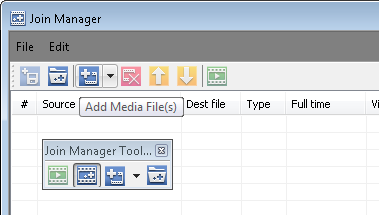
- If the files have different parameters, you will be notified.
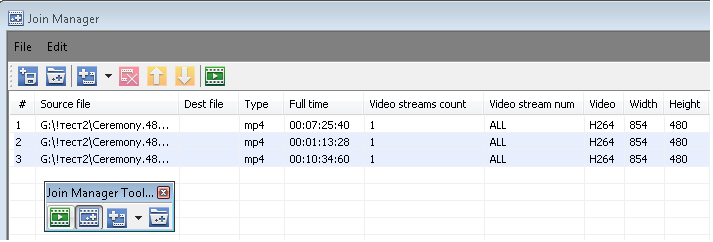
- Sort files.
- Start joining by clicking the Start Joining button or selecting the File->Start Joining menu item.
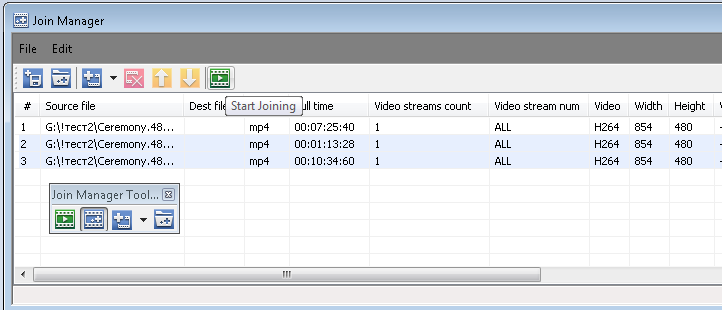
- Enter the name of the destination file and click Save. The progress bar will appear and show the progress.
How to start splitting
To start the trimming process:
- Open your video file.
- Define the fragments you want to keep in the final movie
- Press the Start button (Ctrl + T) or select Edit -> Start Trimming
- If you are asked for a filename, enter a name for the destination file and click Save. The progress bar will appear and showing that splitting is in progress.
Note: selecting the File -> Save Media File As... menu item also starts the trimming process.
| Window element | Description | Shortcut key |
 |
Start: Start the trimming process | Ctrl + T |
See also Edit menu, Keyboard shortcuts, Splitting controls, Batch manager