![]()
How to...
- register Video Splitter
- open a video file
- select video and audio streams
- preview a video clip
- navigate in your video
- set and delete markers
- set intervals to be kept or cut
- fix audio/video synchronization
- start splitting
- start joining
How to register Video Splitter
You can find the pricing and purchase a license for this program right from its web page at https://www.solveigmm.com/en/products/video-splitter/. Click the Buy Now button there.
After ordering you will get an activation key of the following format: "XXXXX-XXXXX-XXXXX-XXXXX".
Online Activation
To activate your product online please do the following:
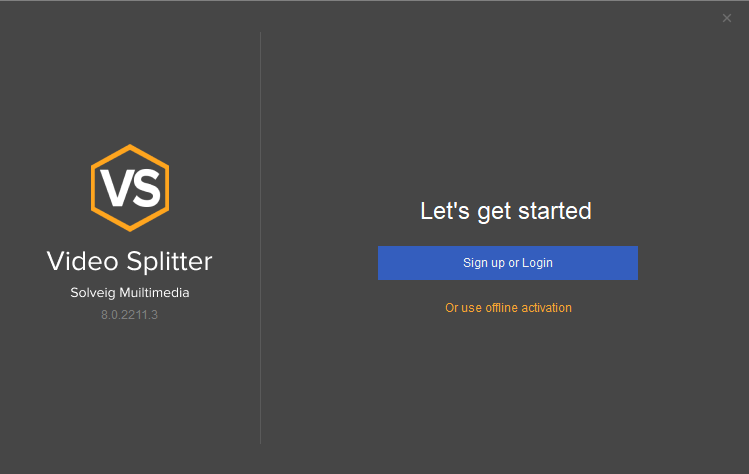
- Open Video Splitter by clicking on its icon or from Start / Solveig Multimedia / SolveigMM Video Splitter.
![]()
- Click on the "Sign up or Login" button to start the authorization.
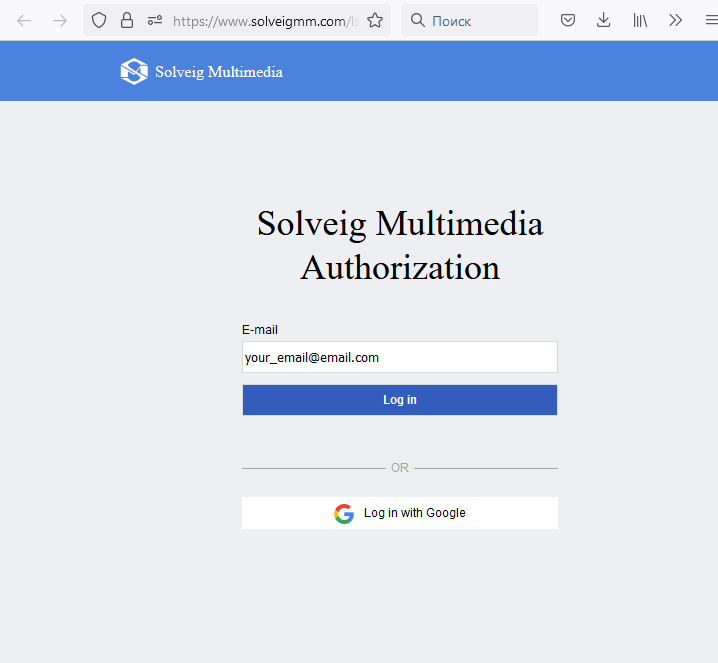
- The browser with the webform will be opened, please fill in the required information.
Enter your email address and click the "Log in" button.
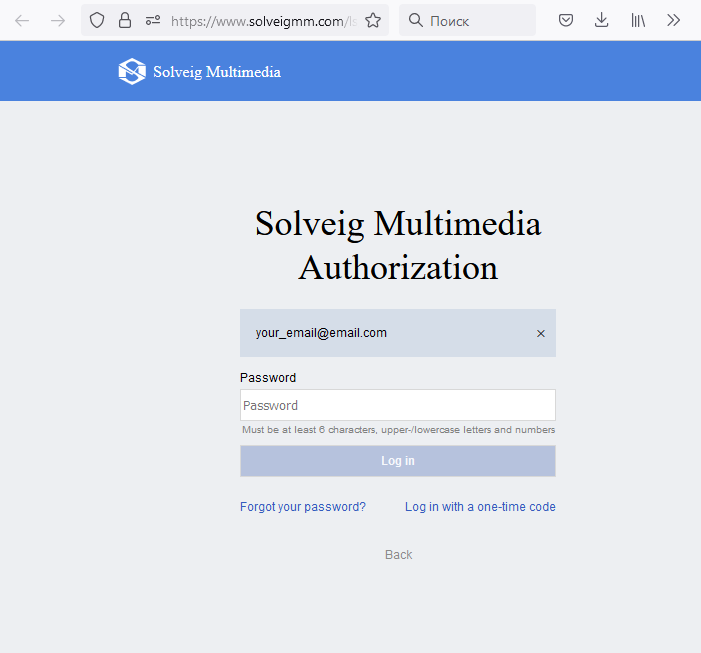
- If you try to register Video Splitter at the first time, please click the "Forgot your password" to set your password or "Log in with a one-time code" to get the temporary code to your email address.
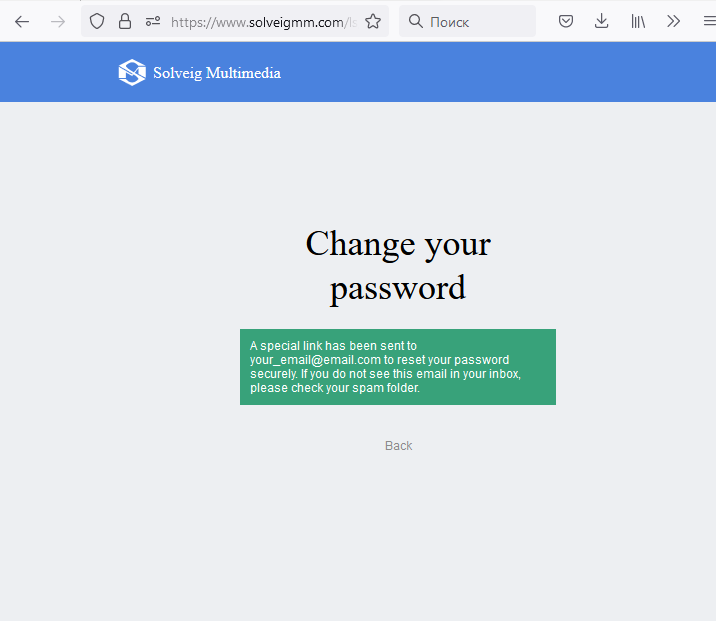
4a) If you select "Forgot your password", please go to your email inbox, you'll get the email from us with the link to set your password. Click the link to proceed.
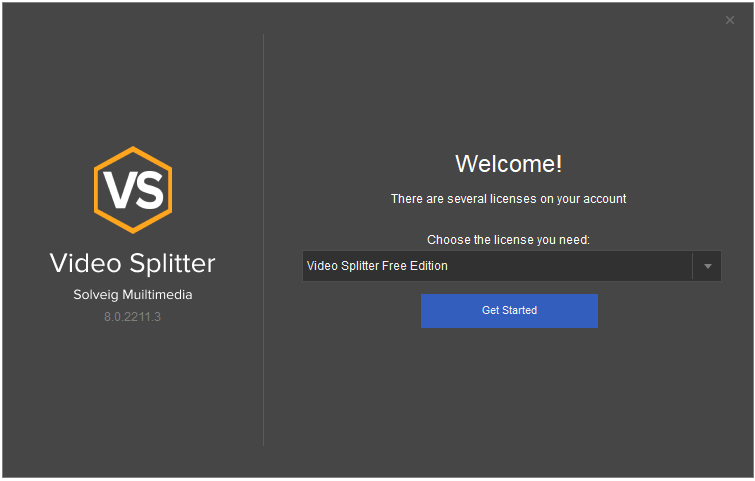
Then enter the password to special fields and click the "Confirm" button. After that the authorization will be completed and you can return to Video Splitter application (Picture 7).
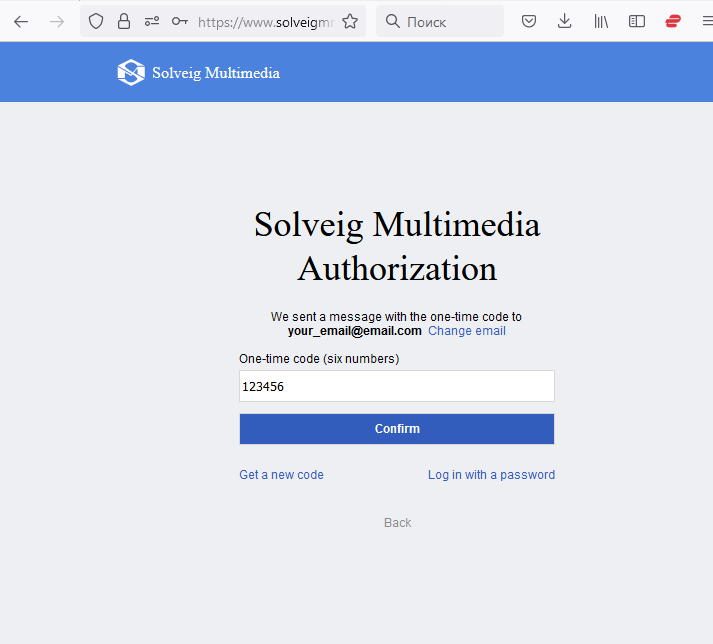
4b) If you select "Log in with a one-time code", you'll get the temporary one-time code to the specified email address.
Enter this code and click the "Confirm" button.
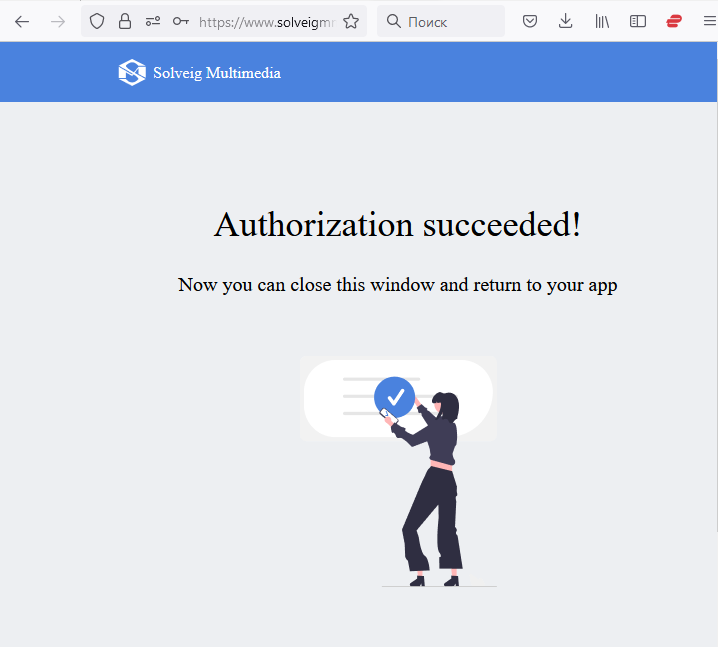
You'll see the following message afterwards. Close the browser and return to Video Splitter application.

- Switch to Video Splitter. Select your Edition in the dropdown menu of the "Welcome" window and click the "Get Started" button.
Enjoy your experience with Video Splitter!
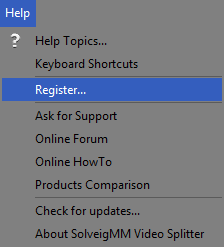
If you have already passed the authorization or have already registered Video Splitter, but would like to change your Edition to another one (e.g. from Free to Home / Business / Broadcast), then you can do it from Help / Register... menu item.
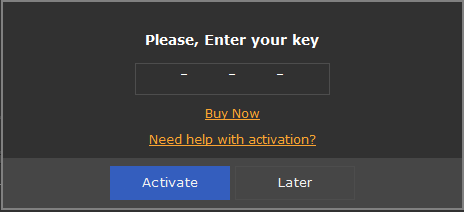
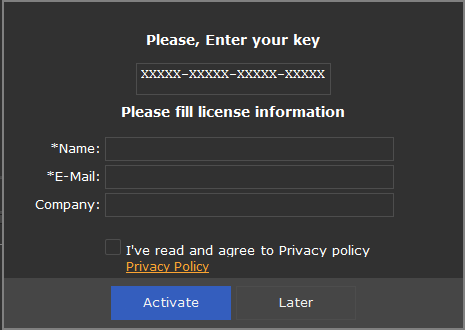
- Enter your license key into the activation window and press "Activate" button.
- Check your license info or enter it if not available. Then click "Activate" again.
Don't forget to agree with "Privacy Policy", please.
Offline Activation
If for some reason you can't activate Video Splitter online there is an option of the offline activation (available only in Business version of the product) that doesn't require the Internet connection on the computer where Video Splitter is installed. To get information for the offline activation, please contact us at support@solveigmm.com.
How to open a video file
To open the video file you want to split, do the following:
Select File -> Open Media File... from the menu. The standard Windows Open File dialog will appear.
Find your video file and click Open.
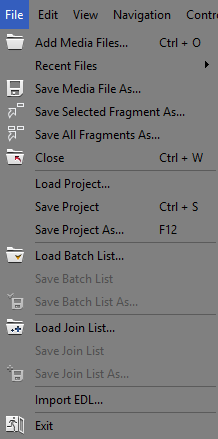
See also Supported file formats, File menu
How to select video and audio streams
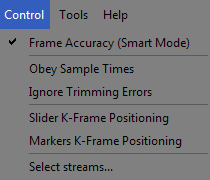
Video Splitter allows you to choose the audio and video streams that will be rendered into the final movie. To choose the streams, open the Control menu and follow "Select streams..." menu item.
The special window will be opened. It is possible to select audio and
video streams for the preview and editing here.
You can see this window also after opening of any file with multiple
video or audio streams.
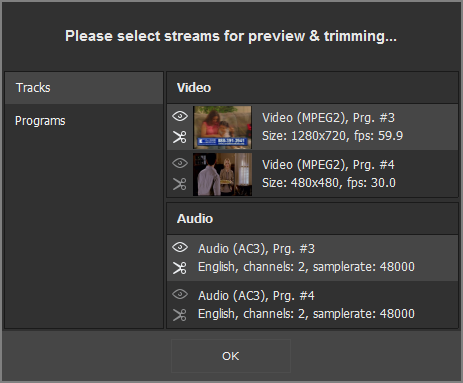
Choose the stream for preview by clicking the icon with an eye
( ). To select streams you want to be present
in the output file, click the icon with scissors
(
). To select streams you want to be present
in the output file, click the icon with scissors
( ).
).
In the example on the above screenshot the first video and the first audio streams were selected for editing.
You can also open the stream selection window by clicking the "Select streams..." button from the dialog window that opens after the trimming start.
See also Control menu, Stream selection window
How to preview a video clip
- Open a video file
- To start playback, click the Play button. Also, you can use the Edit -> Play menu item or the Space shortcut key.
- To pause playback, click the Pause button. You can use the Edit -> Pause menu item or the Space shortcut key.
| Window element | Description | Shortcut key |
 |
Previous K Frame | Left arrow |
 |
Next K Frame | Right arrow |
 |
Play | Space |
 |
Pause | Space |
 |
Next Frame | Ctrl + Right arrow |
 |
Previous Frame | Ctrl + Left arrow |
See also Navigation controls, Edit menu, Keyboard shortcuts
How to navigate in your video
- To advance to the next K frame, click the Next K Frame button or select the Edit->Next K Frame menu item from the menu. You can also use the Right arrow shortcut key.
- To jump to the previous K frame, click the Previous K Frame button or select the Edit->Previous K Frame menu item. The Left arrow shortcut key is also available.
- Left-click the timeline at the position you need.
- Type the necessary time in the edit box in the Navigation controls in the HH:MM:SS.mS format. The position will be automatically adjusted to the nearest previous K frame.
| Window element | Description | Shortcut key |
|
Previous K Frame | Left arrow |
|
Next K Frame | Right arrow |
|
Previous Frame | Ctrl + Left arrow |
|
Next Frame | Ctrl + Right arrow |
See also Navigation controls, Edit menu, Control menu, Keyboard shortcuts
How to set and delete markers
To select interval you need to do the following:
Navigate to the position where you want to add it.
Press the Set new marker key (M) or select the Edit -> Set New Marker menu item
To delete a marker:
- Left-click the marker you want to delete.
- Press Remove marker/fragment key (Delete) or select the Edit -> Remove marker or markers menu item.
To delete all markers from the timeline, select the Edit -> Clear
All Marks menu item or use the Ctrl + C shortcut
Note: markers will be deleted without any confirmation
| Window element | Description | Shortcut key |
 |
Add Begin Marker | M |
 |
Delete Selected Marker | Delete |
| Clear All Markers | Ctrl + C |
See also Edit menu, Keyboard shortcuts, Splitting controls
How to set intervals to be kept or cut
To define a new interval:
- Navigate to the beginning of the future interval.
- Press the Add a marker key (M) or select the Edit -> Set New Marker menu item.
- Navigate to the end of the future interval.
- Repeat step 2.
To adjust the time of the interval start and stop:
- Deploy the collapsed interval. Select the marker at the beginning/end of the interval.
- Drag the marker to the necessry position (or use the the Next K Frame / Previous K Frame buttons) or timebox of the appropriate marker.
To delete a interval:
- Left-click the interval you want to delete.
- Press the Remove marker(s) key (Delete), or select the Edit -> Remove marker or markers menu item.
Note: the interval will be deleted without any confirmation.
To set an interval to be kept:
- Left-click the interval you want to keep.
- Right mouse click and select "Keep On Selected Fragment key (S)" in the opened context menu or select the Edit -> Keep On Selected Fragment menu item.
To set an interval to be cut:
- Left-click the interval you want to delete.
- Press the Cut Off Selected Fragment key (D) or select the Edit -> Cut Off Selected Fragment menu item.
| Window element | Description | Shortcut key |
|
Add New Marker: Add a new marker to the current slider cursor position. | M |
|
Remove Selected Markers: Removes selected markers from the timeline. | Delete |
See also Edit menu, Keyboard shortcuts, Splitting contros
How to fix audio/video synchronization
Video Splitter is designed to split media files without losing audio/video synchronization. However, some media files lose synchronization after splitting. To avoid losing sync, you can try to do the following:
- Open your video file.
- Define the intervals you want to keep in the final movie.
- Select the Control -> Obey Sample times menu item.
- Continue the splitting process as usual.
See also Control menu, How to set intervals to be kept or cut
How to start joining
To start the joining process:
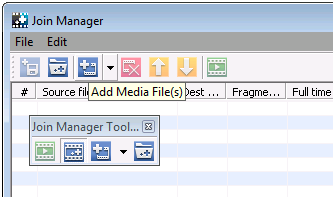
Add the video (audio) files you want to join either using drag'n'drop or by clicking the Add Media File(s) button.
If the files have different parameters, you will be notified.
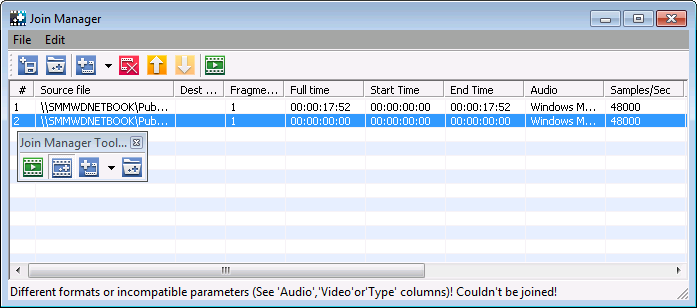
Sort files.
Start joining by clicking the Start Joining button or selecting the File->Start Joining menu item.
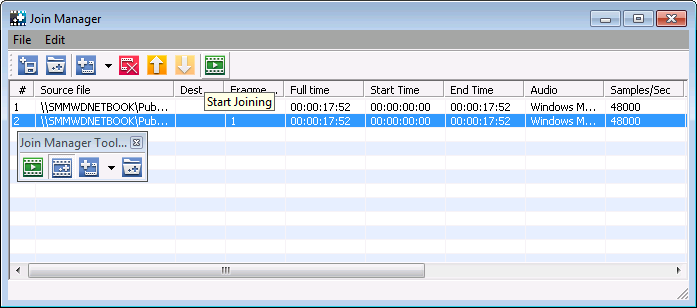
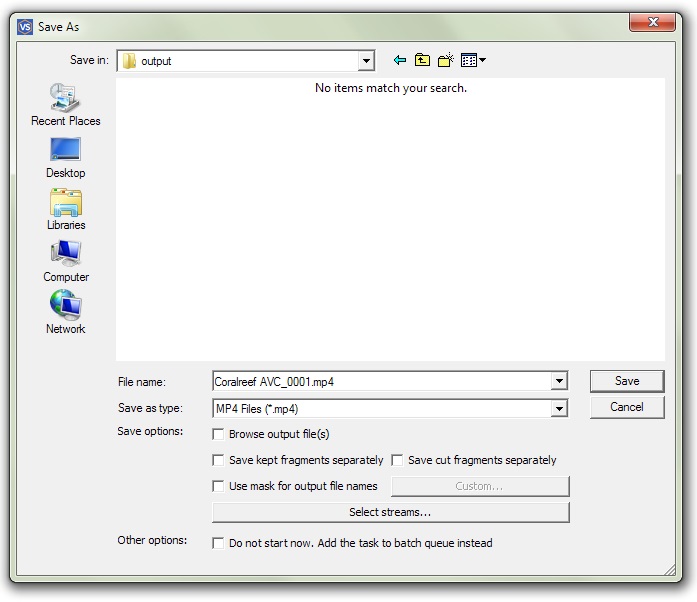
Enter the name of the destination file and click Save. The progress bar will appear and show the progress.
How to start splitting
To start the trimming process:
- Open your video file.
- Define the intervals you want to keep in the final movie
- Press the Trim key (Ctrl + T) or select Edit -> Start Trimming
- If you are asked for a file name, enter a name for the destination
file and click Save.
You can also select streams you would like to be edited and saved in the output file by clicking the "Select streams..." button. The progress bar will appear and showing that splitting is in progress.
Note: selecting the File -> Save Media File As... menu item
also starts the trimming process.
| Window element | Description | Shortcut key |
 |
Save: Start the trimming process | Ctrl + T |
See also Edit menu, Keyboard shortcuts, Splitting controls, Batch manager