 Eng
Eng  Rus
Rus  Deu
Deu  Ital
Ital  Esp
Esp  Port
Port  Jap
Jap  Chin
Chin How to edit your video and audio within Windows Media Player™

By Olga Krovyakova - modified September 28, 2023, created February 28, 2019.
This guide explains how to use WMP Trimmer plugin for fast editing of popular video or audio files like MP4 or MP3 or many other.
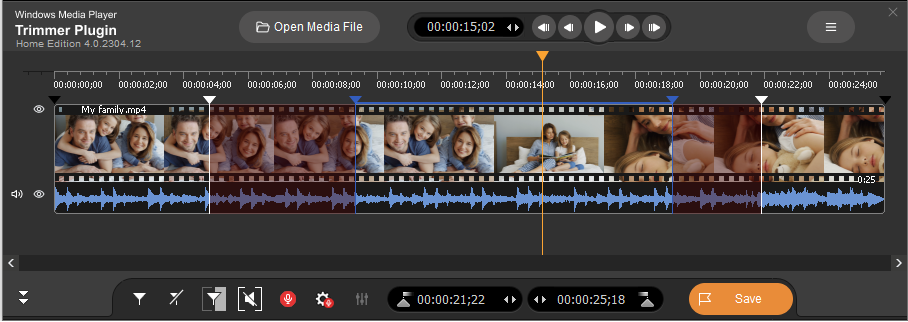
Figure 1
The Windows Media Player Plugin module is designed to operate within Windows Media Player™ version 12 (up to 9). It enables a user to cut or edit out a part of media file directly from Windows Media Player™ at high speed without quality degradation and problems with audio/video synchronization.
Enabling WMP Trimmer Plugin
- Install WMP Trimmer Plugin from its home page and launch Windows Media Player. The plugin should arise within the player.
- If it is disabled click main menu item «Tools->Plug-ins->SolveigMM WMP Trimmer Plugin» to enable it (Figure 2).
If the main menu of Windows Media Player is switched off, right mouse click at the upper area of Windows Media Player and follow same menu items.
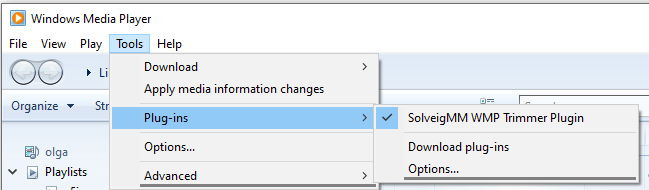
Figure 2
Trimming media files
Trimming media files is easy and straightforward. Trimmer’s GUI controls are shown in Figure 3.
See the datailed scheme of controls at Figures 14, 15.

Figure 3
The operations order for trimming media file is listed below.
1. Open your media file in usual way via Windows Media Player menu (Figure 4a) or use "Open Media File" button of WMP Trimmer Plugin (Figure 4b).
You can also select a file in the library of the player.
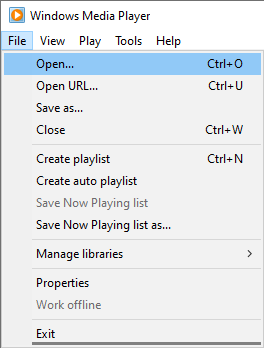
Figure 4a

Figure 4b
2. Click the "Edit this file" button of Plugin (Figure 5).

Figure 5
3. You will see the expanded view of Plugin. Use slider and markers to set the start and stop time positions of the fragments you would like to save.
To mark the beginning of the fragment navigare the slider to the desired position and click the "Add marker" button (or "M" hot key).
Do the same to mark the end time position of the fragment
To mark several fragments use the same operation to set start/stop time positions.
You can use mouse wheel to change the scale of timeline for convenience and to easily find the needed frame of end/beginning.
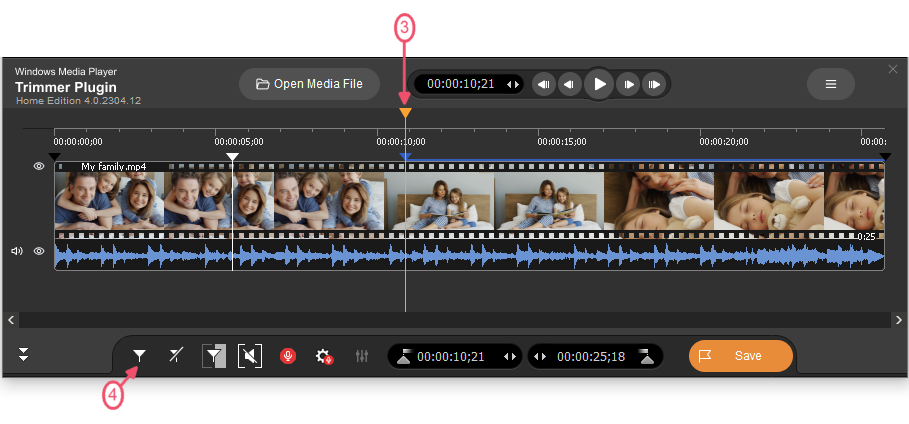
Figure 6

4. Now it is necessary to mark fragments you would like to be cut out from the output video file. Move the mouse cursor to such fragment and click the "Scissors" button or "D" hot key.
Do the same operation for all fragments you would like to be deleted (Figure 7).
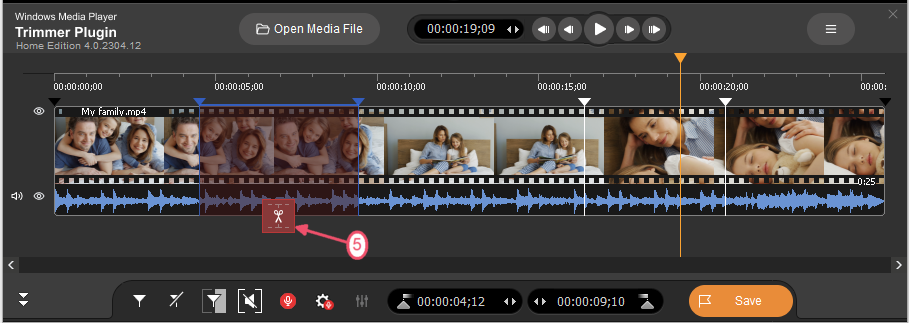
Figure 7
5. When all fragments that you would like not to be presented in the final video are set, press the "Save" button to start the editing process or "Ctrl+S" hot key (Figure 8).

Figure 8
6. You will be asked for a file name of the output file and folder to save it in (Figure 9).
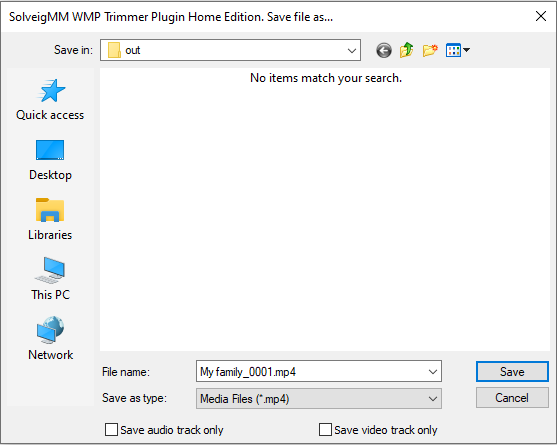
Figure 9
7. The trimming process will be displayed with a progress bar and can be canceled at any time if required (Figure 10).

Figure 10
8. When the trimming process is done, you will be informed with the corresponding message (Figure 11).
Click the "Yes" button in the message dialog if you want to open folder with output media file. Click the "No" button otherwise.
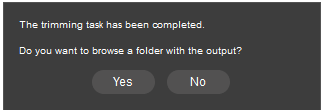
Figure 11
The output file is created!
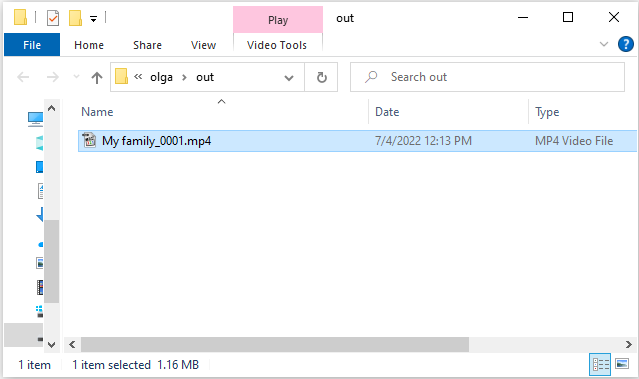
Figure 12
That's all! Good luck with your editing projects!
WMP Trimmer Plugin supports formats as follows
- MP4 (*.mp4)
- MPEG Audio (*.mp3,*.mp1,*.mpa )
- FLV (*.flv)
- AVCHD (*.m2ts)
- WebM (*.webm)
- MKV (*.mkv)
- MOV (*.mov)
- AVI (*.avi )
- DV AVI type 1,2 (*.avi)
- Windows Media Video (*.asf, *.wmv,*.wm)
- Windows Media Audio (*.wma)
- MPEG-2 Video PS,TS,VES (*.mpeg,*.vob,*.ts)
Since version 4 WMP Trimmer Plugin supports editing of MP4, MKV and TS files with HEVC codec and the editing of 4K video files in Business Edition.
Please see the scheme with all controls of WMP Trimmer Plugin expanded view at the picture below (Figure 14).

Figure 14. SolveigMM WMP Trimmer controls (expanded view)
The mimimized view of WMP Trimmer Plugin looks like this (Figure 15).

Figure 15. SolveigMM WMP Trimmer controls (minimized view)
- https://www.solveigmm.com/en/howto/how-to-split-mpeg2-file-with-video-splitter/
- https://www.solveigmm.com/en/howto/how-to-cut-out-commercials-from-video-with-video-splitter/
 Olga Krovyakova is the Technical Support Manager in Solveig Multimedia since 2010.
She is the author of many text and video guidelines of company's products: Video Splitter, HyperCam, WMP Trimmer Plugin, AVI Trimmer+ and TriMP4.
She works with programs every day and therefore knows very well how they work. Сontact Olga via support@solveigmm.com if you have any questions. She will gladly assist you!