By Olga Krovyakova - modified April 9, 2024, created March 26, 2019
SolveigMM Video Splitter is the easy to use and fast video editor that supports all popular file formats editing, such as AVCHD, FLV, MP4, MOV, WEBM, MKV, AVI, ASF, WMV, MPEG-2, MPEG-1, WAV, WMA and MP3.
Since vesion 5 SolveigMM Video Splitter was enhanced with the special dialog for selecting streams for preview and editing. Read this short guideline to find out how to select streams to preview or edit in the product.
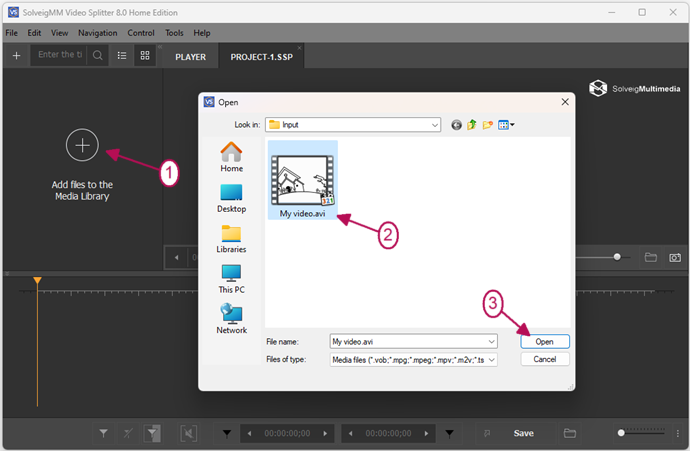
1.Downloadand install the product on your computer.
2. Launch Video Splitter from its yellow icon on the desktop or followStart -> All programs -> Solveig Multimedia -> SolveigMM Video Spliter Home Edition.
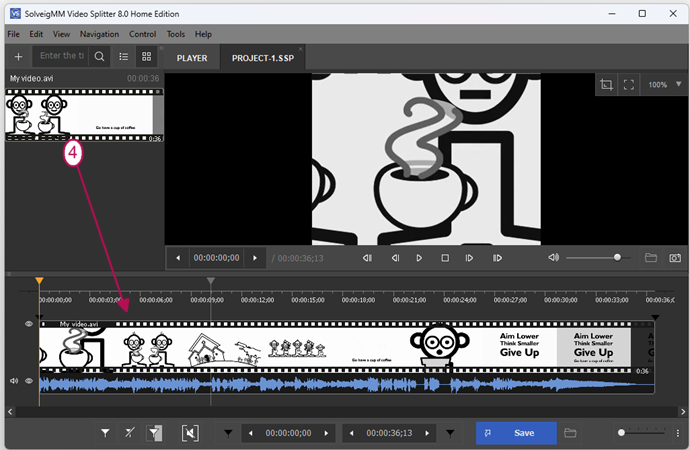
3. Move the file from the Media library to the timeline.
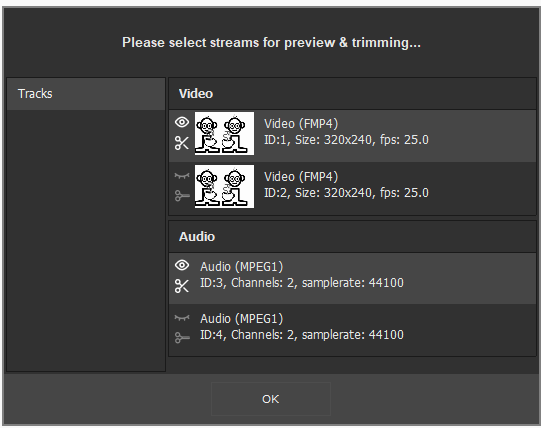
4. Open "Stream selection" window by following the Control ->Select streams... menu.
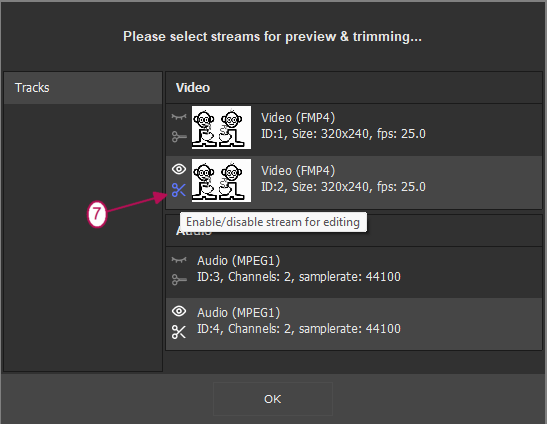
5. Window of stream selection will appear.
Since version 5 Video Splitter was enhanced with such new features as the editing files with multiple subtitles and audio tracks therefore if you would like to save several audio or subtitles tracks you should select these streams for saving before the editing start.
Please find below the description of icons that are used for stream playback and edit selection.
Icon
Description
Shows that the stream is selected for the preview
Shows that the stream is selected for the editing
Shows that the stream is not selected for the preview
Shows that the stream is not selected for the editing
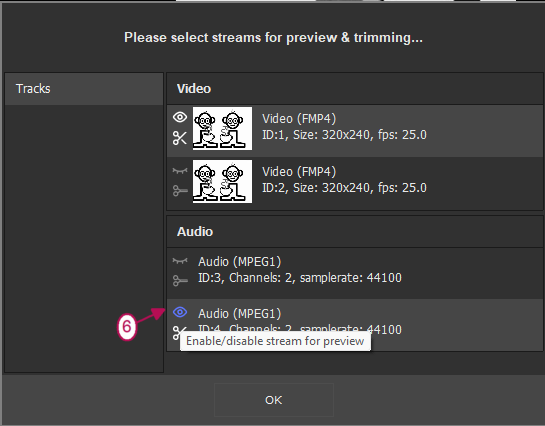
If you would like to change the stream for preview then click on the icon with disabled eye to turn it on. After clicking it becomes enabled.
In the example depicted on the screenshots below we have changed the audio stream for preview from the first (MPEG1) to the second one (AC3) by clicking the disabled icon with an eye near the string with AC3 audio.
If you would like to change the stream for the editing or select additional stream for editing, then click on the icon with disabled scissors to make it turned on.
Please note, that you can select only one video track for editing and several audio or subtitle tracks for editing.
In the example depicted on the screenshot below we have clicked on the disabled icon with scissors and an eye near the FMP4 video track to change the video track from the first (DIVX) to the second one (FMP4) for the editing and preview.
So we have selected video track of FMP4 video for preview and editing and two audio tracks for editing. All these streams will be presented in the output video file. The second audio track with AC3 audio will be used on the Video Splitter preview.
After all changes with the stream selection were done, click the "OK" button to confirm your choice.
Now you can mark fragments for saving and deleting and edit the file as usual.
Olga Krovyakova is the Technical Support Manager in Solveig Multimedia since 2010.
She is the author of many text and video guidelines of company's products: Video Splitter, HyperCam, WMP Trimmer Plugin, AVI Trimmer+ and TriMP4.
She works with programs every day and therefore knows very well how they work. Сontact Olga via support@solveigmm.com if you have any questions. She will gladly assist you!
 Eng
Eng  Rus
Rus  Deu
Deu  Ital
Ital  Esp
Esp  Port
Port  Jap
Jap  Chin
Chin 


 Olga Krovyakova is the Technical Support Manager in Solveig Multimedia since 2010.