 Eng
Eng  Rus
Rus  Deu
Deu  Ital
Ital  Esp
Esp  Port
Port  Jap
Jap  Chin
Chin How to enable sound recording from your system in Windows Vista or Windows 7-11

By Olga Krovyakova - modified June 16, 2026, created April 2, 2019
Need to record system sound in Windows Vista or Windows 7-11? Use the Solveigmm's HyperCam sound recorder to bypass the recording sound limitations on these operating systems.
HyperCam is one of the best sound recording software. To record system sound as well as music and voice recording consider some aspects of this audio recorder for pc.
You can use the HyperCam in Windows 7-11 or Windows Vista for audio recording with or without video recording.
To record only the audio track you need to click on the "Audio recording" button.
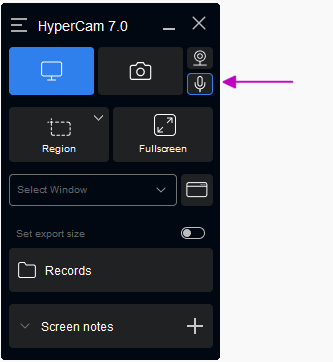
The audio recording section will be opened.

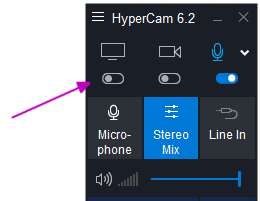
Here you can select what you need to record: System audio, sound from Microphone or both settings.
You can also enable/disable sound settings in the panel near the orange recording frame.

At the moment HyperCam from SolveigMM is the fastest, most proficient and very simple way to make digital video and audio recording. The HyperCam versions are constantly updated and improved.
How to enable your system sound recording in Windows Vista or Windows 7-11
Important note: since version 7 of HyperCam, Stereo Mix is not more available for selection in its sound settings.
HyperCam 7 uses its internat setting to record sound: no need to enable Stereo Mix for users of version 7 or later versions when they will be released.
The information below is actual for users of the earlier versions of HyperCam (versions 3-6).
To record sound with HyperCam versions 3, 4, 5, 6 in Windows Vista or Windows 7-11 you need to make sure the Stereo mixer is turned on by following the steps below.
In Windows 11:
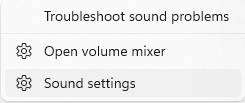
1. Right mouse click on the Sound settings icon on the task bar (![]() ).
).
2. Select "Sound settings".
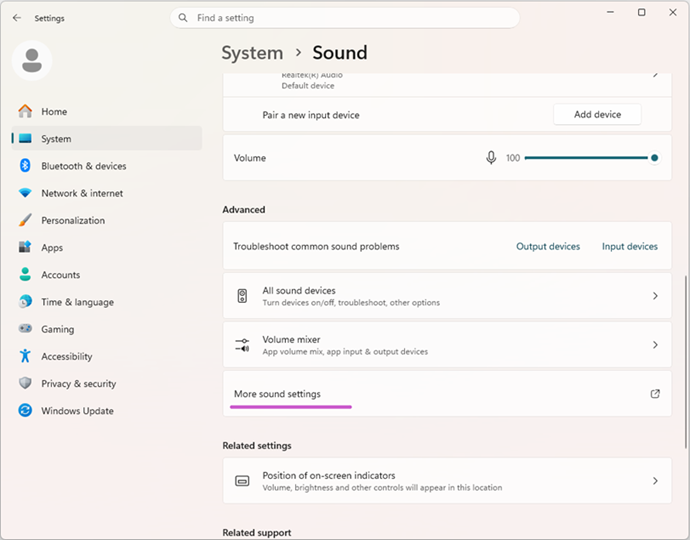
The Windows Preferences section called System > Sound will be opened.
3. Navigate to More sound settings section.
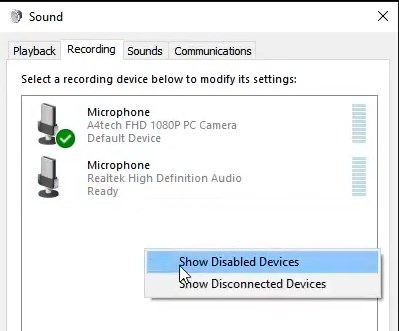
3. Select the "Recording" tab.
4. Right mouse click on the free tab area and enable the "Show Disabled Devices" setting.
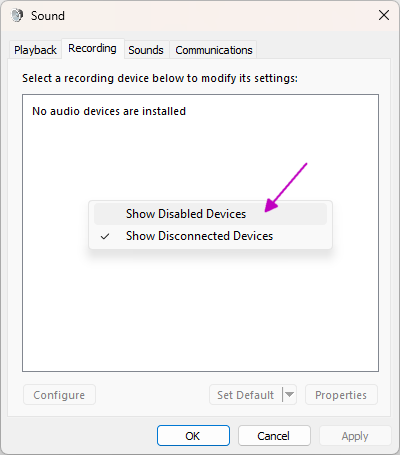
5. A window will open and you will see all inactive devices. Right click on "Stereo Mix" ("Wave Out Mix", "Mono Mix", etc.) and click "Enable".
Click OK.
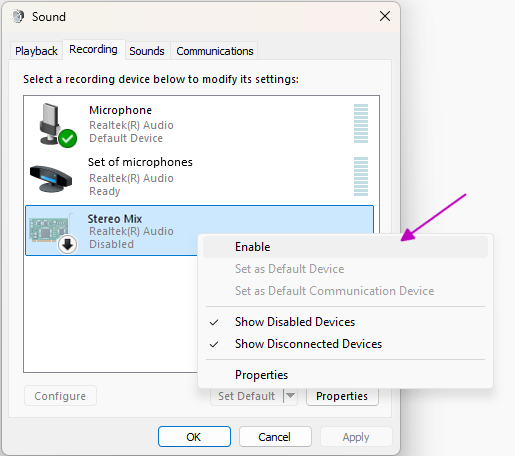
7. To make the device you just turned on as the default recording channel select it from the list and click "Set as default".
The steps sequence for turning on the stereo mixer for Windows 10 is different.
You will need:
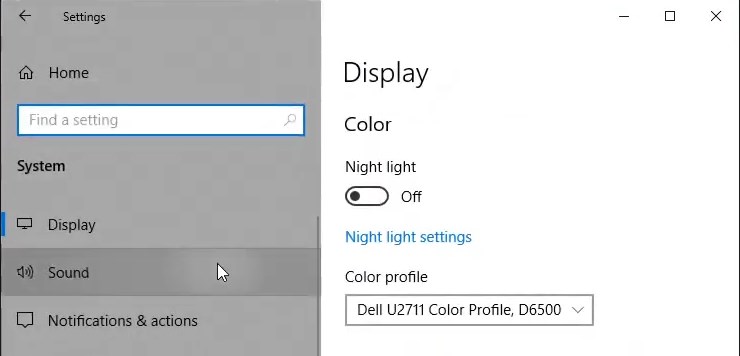
1. Open the "Parameters" section in the "Start" menu (there is an icon Gear in the left column).
2. Click the "System" button and then select the "Sound" tab.
3. In the "Related Options" section click on the "Sound Control Panel".
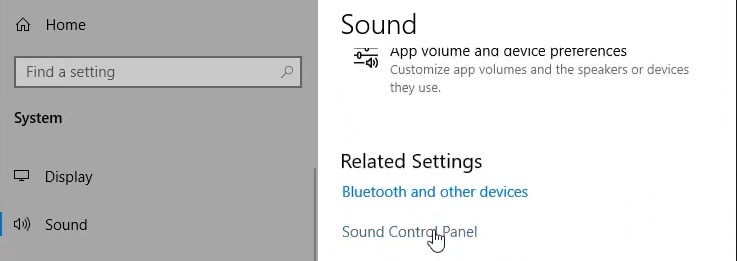
4. Select the "Record" tab.
5. Open the context menu with the right mouse button and select the "Show disconnected devices" function.
6. A window will open and you will see the list of inactive devices. Right-click on "Stereo Mix" ("Wave Out Mix", "Mono Mix", etc.) and click "Enable".

7. Click OK.
8. To make an activated device the default recording channel select it in the list by clicking on "Use as default".
The "Stereo Mix" availability depends on your sound card and drivers. You may not see this line in the list of disabled devices.
If you managed to enable sound recording as described above, apply special settings before starting recording with the HyperCam.
1. Download the HyperCam sound recorder for Windows 7-11 from our website.
2. Install the Windows 7-11 sound recorder software on your computer.
3. Double click the HyperCam audio recorder icon on the desktop to launch the program and start recording computer audio. You can also record music.
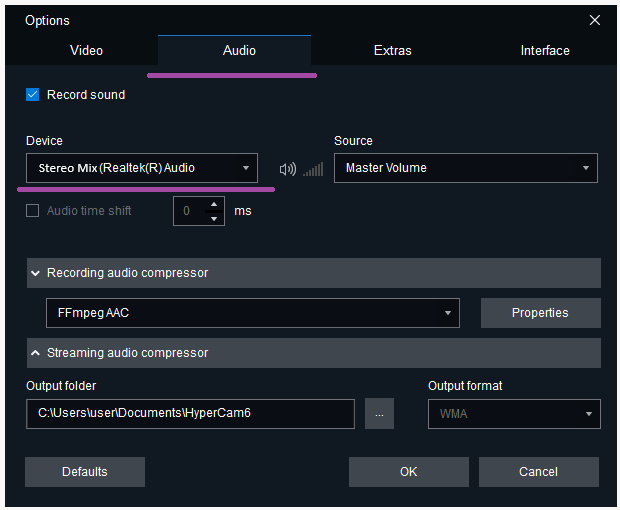
4. Navigate to “Options”, select the “Audio” tab, check the “Record sound” checkbox and select “Stereo mix” to record internal sound in the “Device” drop-down list (when working with a stereo mixer consider that it must first be turned on in system; you can also use “System Audio”).
Be sure to select computer screen recording with sound (including from a microphone) and turn off screen recording.
If you record sound with video and you only need sound, you can remove video from audio using the HyperCam Media Editor or another program from Solveigmm - Video Splitter.
5. If you want to record both video and audio, leave the setting above enabled.
Adjust compression parameters (if necessary). By default the recording is performed in the MP4 format, and audio is encoded in the AAC format in this case. You can get uncompressed audio if you are recording a video in the AVI format.
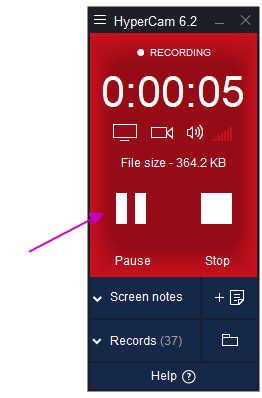
6. To start recording audio click the big red button - this is the start recording button.
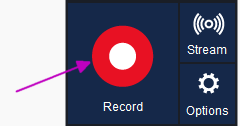
7. If you need to stop and then resume audio recording on Windows 7 / Vista you can use the interface buttons that stand for “Stop”, “Pause”, “Start”.
To see the result of your capture audio actions navigate to the “Recent Recordings” section.
Watch how to enable sound recording from your system in Windows

Frequently Asked Questions
How to Record Audio from the command prompt?
How to record a zoom meeting?
How to record system sound from your computer?
How to record audio on Windows 10?
How to record skype calls?
Record high quality audio (computer system sound) with the HyperCam from SolveigMM. It's quick and easy! To check the functionality you can use the trial version of the software. But keep in mind that the recordings that were made using the demo program are limited in time (5 minutes). In addition, when using the demo version of the software you will receive reminders that you are using the trial period and you need to activate it by purchasing a license. Purchasing the license, whether you choose HyperCam Home Edition or HyperCam Business Edition, will solve this problem and you will get access to the best video and audio recorder.
- https://www.solveigmm.com/en/howto/hypercam-3-tutorial/
- https://www.solveigmm.com/en/howto/how-to-register-hypercam/
 Olga Krovyakova is the Technical Support Manager in Solveig Multimedia.
She is the author of many text and video guidelines of company's products: Video Splitter, HyperCam, WMP Trimmer Plugin, AVI Trimmer+ and TriMP4.
She works with programs every day and therefore knows very well how they work. Сontact Olga via support@solveigmm.com if you have any questions. She will gladly assist you!