 Eng
Eng  Rus
Rus  Deu
Deu  Ital
Ital  Esp
Esp  Port
Port  Jap
Jap  Chin
Chin HyperCam Tutorial

By Olga Krovyakova - modified March 5, 2026, created March 23, 2019
Table of Contents
How to Record a Screen Video
How to Capture a Full-Screen Video
How to Capture a Video of a Particular Window
How to Capture a Video of Some Screen Region
Working with recent records
How to Add Screen Notes to Your Video
How to Configure a CODEC Used for Recording
How to Record an Audio
How to Record the Webcam
Panning the Capture Area While Recording
How to Display Screen Notes by Timer
How to Edit Your Video
Files sharing
Configuring HyperCam
Configuring Screen Notes
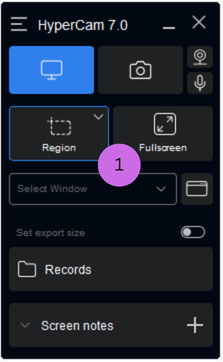
Step 1. Start HyperCam.
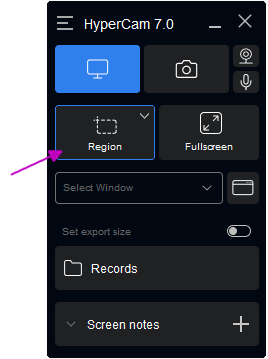
You should see its main window opened. Before you can start recording a video, you should select one of the available capture areas. You can read more about different capture modes here, but now simply click the "Region" button. Marked as "1".
Step 2. Define the region of your screen you would like to record. Simply point the upper-left corner of the region with the mouse and click to confirm, then resize to the bottom-right corner and click again. You should see a border indicating the region of your choice:

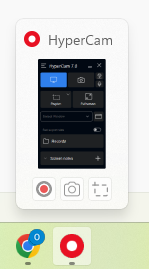
Step 3. Now click the red button to start recording the video. Also remember the hot key for the start/pause action - F2. Press it at any time to pause the recording or resume it again. Once the recording starts, you'll notice that HyperCam window has disappeared from the screen (obviously, you don't want it in your video) and has minimized to a HyperCam Toolbar:
Step 4. Now do some actions within the capture area - move your mouse back and forth, open some applications, or whatever else you want to record. To pause the recording, press F2.
Step 5. Now as the video recording is paused, move your mouse to the HyperCam Toolbar and click the Stop button. You can also simply press F3 which is the default hotkey for the Stop action.
Congratulations! Your first video is ready!
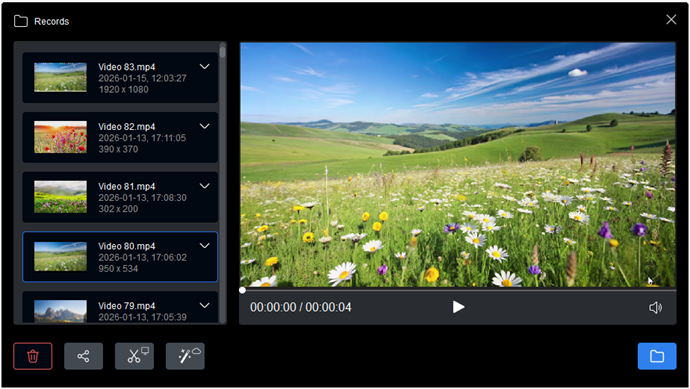
You will see your newly created video in the Records section, where you can replay, share, browse or edit it in HyperCam Media Editor or in Online Video Editor.
How to Capture a Full-Screen Video
HyperCam supports several capture modes: a full-screen capture, a region capture and a window capture.
A full-screen capture is convenient when you need to show what is happening on the entire screen area, for example, to clearly display the interaction of applications.
To capture a full-screen area, follow these steps:
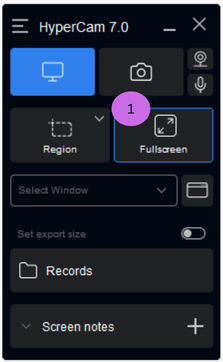
Step 1. Run HyperCam if it is not yet running. You should see the main window of the program. Then, click the Fullscreen button to select the Full-screen capture mode. In this mode the entire screen area is recorded.
Step 2. Click the "Start recording" button (the red one) or press F2 to start recording the video.
Step 3. When you have finished, press F2 to pause the recording, or F3 to stop the recording and save the video stream onto your hard disk as an MP4 file. You can find all of your recorded videos in the Records section:
How to Capture a Video of a Particular Window
HyperCam allows you to limit the recording area with some particular window - a browser page, a text editor or even a button or a drop-down list in any application - these all are windows.
Step 1. First, run HyperCam if it is not running and in the main window, select the Window capture mode:
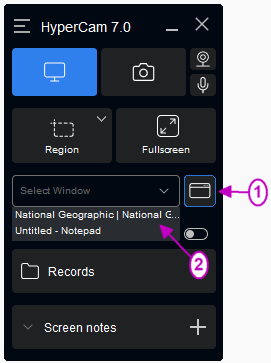
Step 2. Now you should select a window to capture. There are two ways to do that: you can select the desired window directly with the Select window button (1) or choose it by caption from the drop-down list (2). Notice that the window of your choice is highlighted with a orange border:

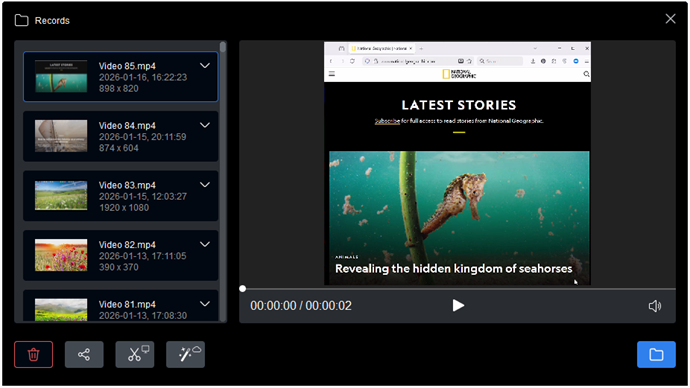
Step 3. Press F2 to start recording a video. Once you finish, press F3 to stop the recording and to save the MP4 file to your hard disk.
You will see you recording in the Records window.
How to Capture a Video of Some Screen Region
With HyperCam you can easily record a video of any given region on the screen. This could be a part of some application window, for instance, or simply some area of the screen.
Here is how you can capture the video of a screen region:
Step 1. Run HyperCam if it is not yet running and in the main window click the Region mode button.
Step 2. Outline the desired capture region with the mouse. Move the cross-hair over the screen and define the top-left and the bottom-right corners of the region. As you finish, you should see a border framing the region you have selected:

Step 3. Note, you can fine-tune the region with mouse or by typing the exact values in the corresponding edit-boxes in the main window:
![]()
Step 4. To start recording click the big red button or press F2. To stop recording and save the resulting video file press F3.
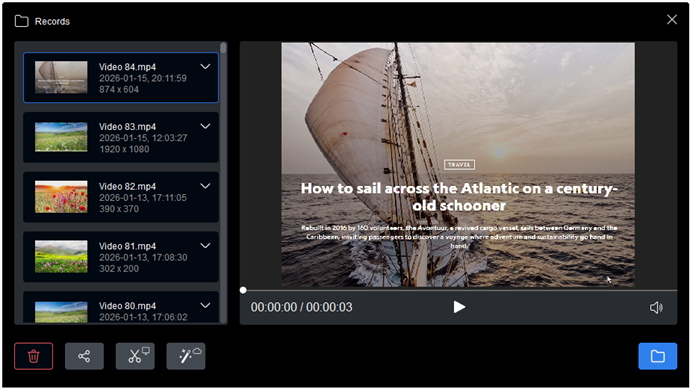
Working with recent records
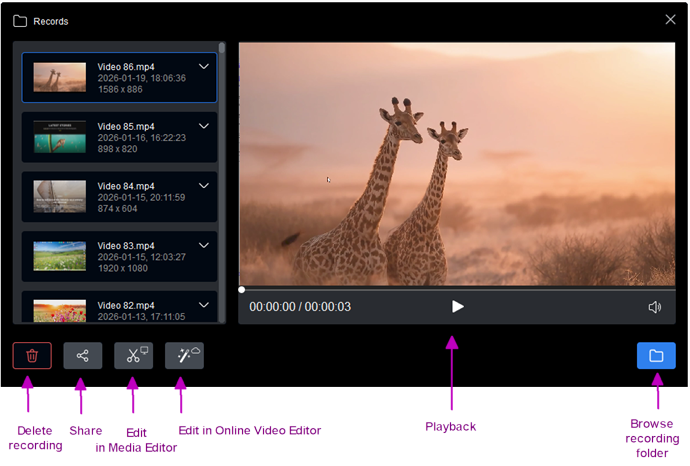
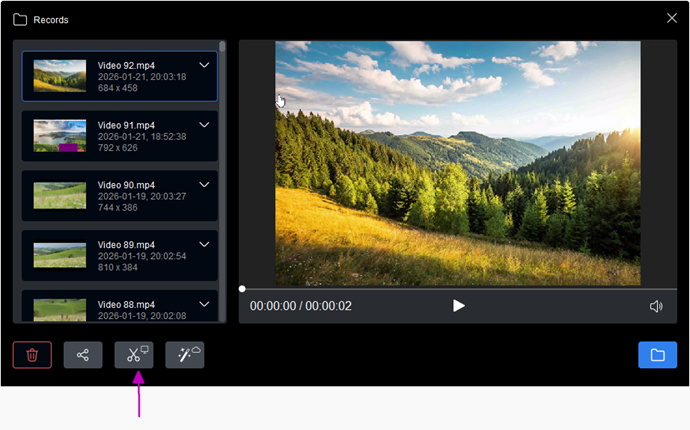
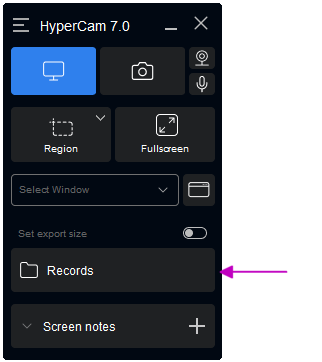
In HyperCam all recorded videos are stored in the Records section: 
In this section you can replay your videos, share it with anyone, modify them with HyperCam Media Editor or Online Video Editor, browse the folder they are stored in or remove unnecessary records.
Select the video in the list and click the desired action button.
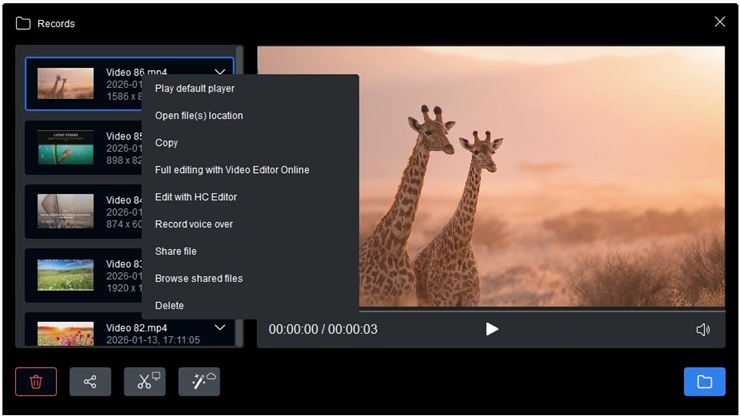
You can also access main actions with records by right mouse click on the recorded file and selecting the appropriate menu item.
How to Add Screen Notes to Your Video
Recording a screen video is fine, but you often need to add some notes to it, you know - focus the attention on some details, mention unclear matters, comment your actions etc. You may also want to add subtitles to your video to help foreign audience understand your voice comments.
All of the above is available in HyperCam. Here is how you can add screen notes to your records.![]()
Step 1. Before recording a video you should create screen notes. Switch to the Screen notes section. This is the list of available screen notes. Now it is empty, so click the Add button ![]() to create a new screen note.
to create a new screen note.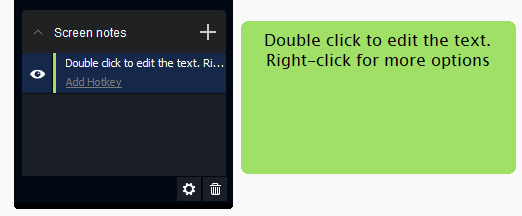
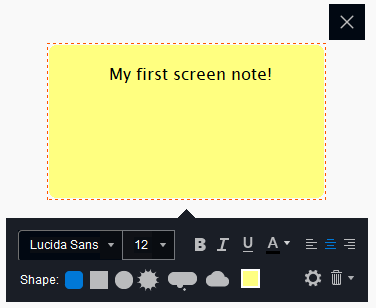
Step 2. You should see that a note has appeared on the screen and in the list of screen notes:
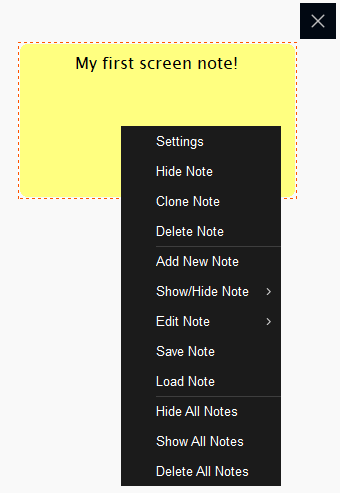
Double-click a note to edit its text and type "My first screen note" there. Also note, that you can adjust the note with the right-click pop-up menu
Right mouse click on the note to open the context menu of different options for the created note.
Step 3. Set up the position and the size of the note with the mouse.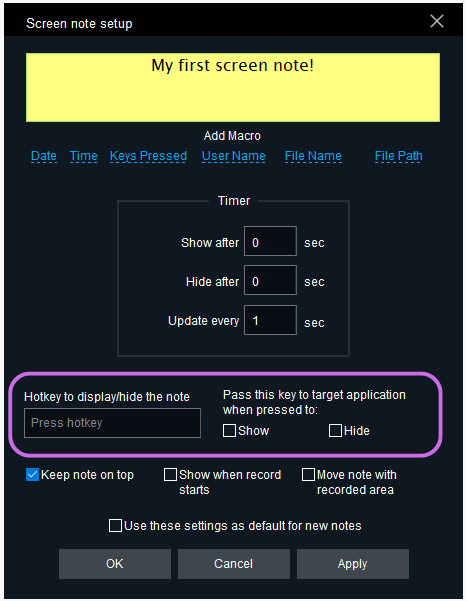
Step 4. Now you need to define the way this note is shown. There are two options here: you can either bring it up manually with a hotkey, or set it to appear automatically on timer. Both options require additional configuration, so select the note in the list and click the Edit button. The Screen note setup window appears. Let's setup a hotkey for our first note.
Step 5. Look at the highlighted area on the above picture. Here you can assign a hotkey that will trigger the note on the screen. Let's say it will be Ctrl+F. Focus the edit-box and press Ctrl then F on your keyboard.
Step 6. We want our note both to display and to hide off the screen when we press the hotkey, so check both options:

Step 7. Save the settings by pressing the OK button ![]() . Congratulations! You have created your first screen note! Now you can bring it up at any time while recording your video with the Ctrl+F hotkey.
. Congratulations! You have created your first screen note! Now you can bring it up at any time while recording your video with the Ctrl+F hotkey.
How to Configure a CODEC Used for Recording
With HyperCam you can encode the output screen video into any given format, including MP4, AVI, WMV, DivX, XviD, Intel Video and many others. All you need is to setup appropriate codecs in your system and configure them accordingly.
Here is the step-by-step tutorial.
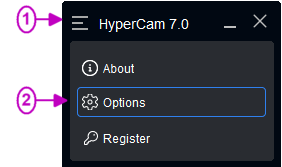
Step 1. Run HyperCam or switch to its window if it is already running. Go to the humburger-menu and click the Options. The Options window should automatically pop up.
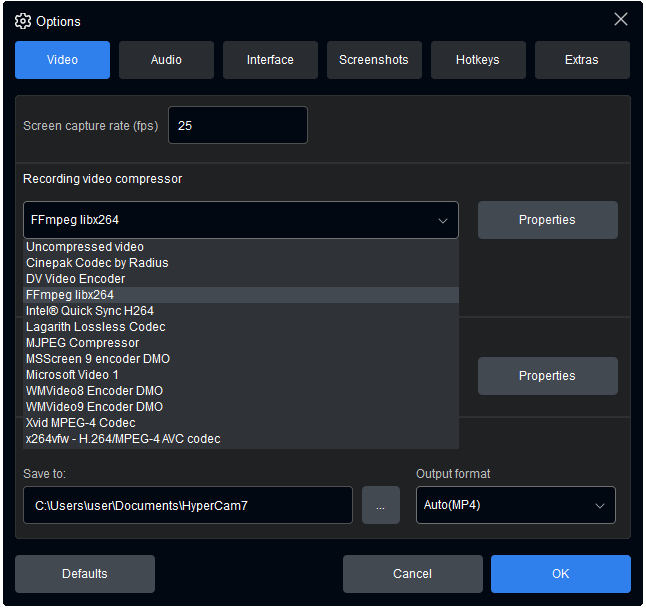
Step 2. At the Video tab (which is selected by default) you can see a drop-down list with all video compression codecs installed on your computer. Select the desired codec from the list.
By default the video options are the following:
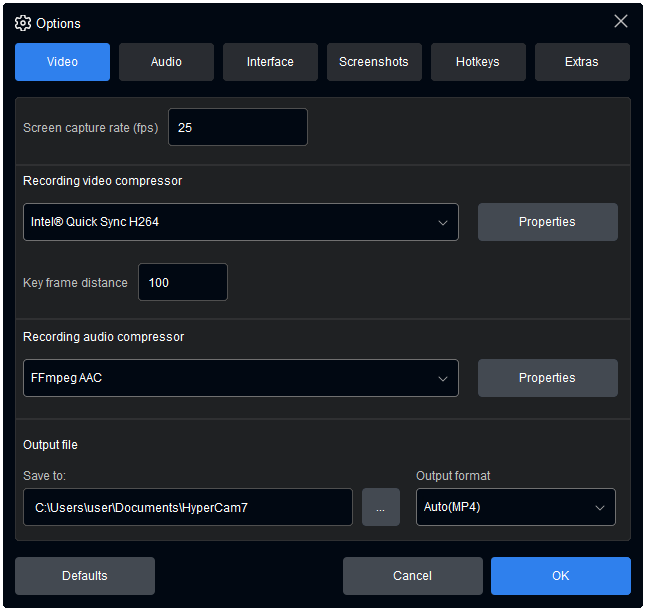
Step 3. Click the Properties button to adjust the compression settings if needed (refer to a certain video codec documentation to learn more about compression options).
Note: This tab also allows you to adjust the frame rate of your video and select the output folder where the recorded video will be saved.
Step 4. Click the OK button ![]() to save the options and return to recording.
to save the options and return to recording.
How to Record an Audio
An appropriate background audio can be as important as video itself. For instance, it is irreplaceable if you want to add voice comments to your actions while recording a video. Another possible application is capturing a game video or a movie - both need a sound to be recorded alongside with a video stream.
With HyperCam you can record an audio too.
By default the audio will be recorded with your video too, both from system audio and microphone.
The settings of audio looks like this - you can select the needed michtophone from available in your system, audio compressor and format. 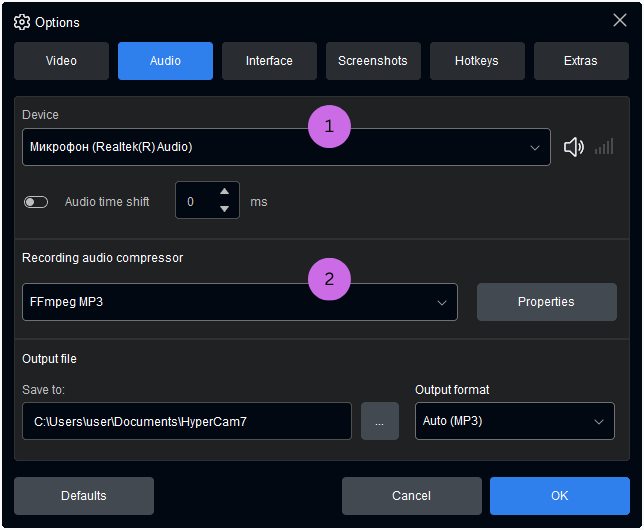
If you would like to disable some option (microphone or system audio), you can do it here, after you select the region for recording.

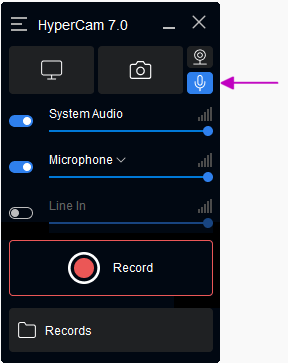
If you would like to record audio only, click on this icon on the main window.
Here you can select if you need to record both with System Audio and Microphone, or disable any device.
Recording the webcam
Starting from version 7 you can record your webcam image.
To enable webcam recording click on this button:
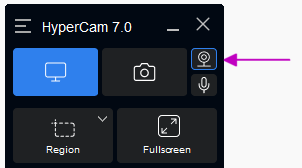
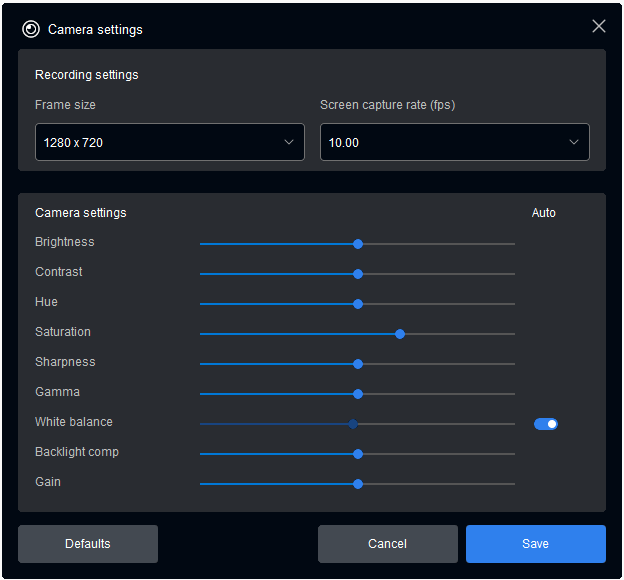
The window of your camera will appear. Here you can start/stop the recording or configure your camera settings.

If you would like to record both your desktop and the webcam, you need to turn the webcam recording before the recording start here, after selecting the region (1).
You can also select the shape of the webcam image on the same panel (2).

Panning the Capture Area While Recording
The Pan Lock feature in HyperCam allows you to pan the recorded area along the screen so it would follow the mouse cursor. Such approach can be extremely convenient in some cases.
Imagine: you need to capture a single application, but also need to record how you run it from the Start menu. Normally, this would require you to enlarge the region of capture or to record the entire screen contents. However, with the Pan Lock feature turned on you can do the same in a smarter way and decrease the size of the output video as well.
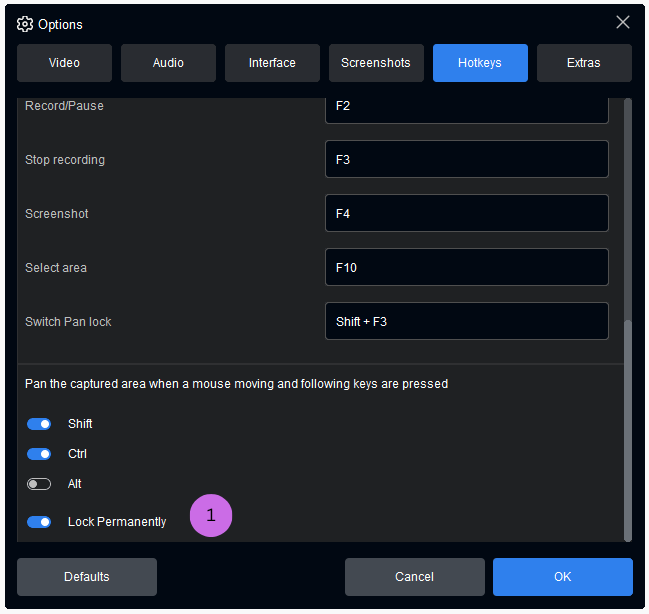
Step 1. Having HyperCam already running, click to the hamburger-menu, then Options menu to bring up the Options window. Switch to the Hotkeys tab.
There are three ways to turn on the Pan Lock feature (1):
- First, you can trigger it on and off with the predefined hotkey, it is Shift + F3 by default.
- Second, you can press a modifier key or keys (Shift + Ctrl in our case) - while these keys remain pressed, the capture area pans and follows the mouse cursor.
- Third, you can lock the pan mode permanently with the corresponding option.
Step 2. Let's stick with Shift + Ctrl for now. Turn on the corresponding checkboxes and save the Options by clicking the OK button.
Step 3. Now start recording a video. Note: the Pan Lock mode works only with the Region capture and the Window capture modes.
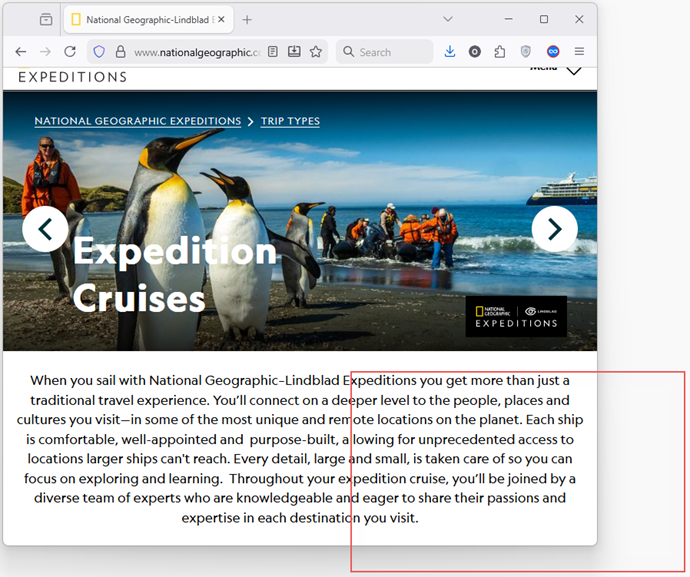
Step 4. As the capture starts, press Ctrl + Shift simultaneously. Then, still holding the buttons start moving your mouse. You should see the capture region pans following the cursor:
Step 5. Release Shift + Ctrl when the region is set where you want it to be. To stop the recording press F3.

The recording area will be moved to the position of your mouse cursor.
How to Display Screen Notes by Timer
Please refer to the screen notes tutorial to learn the basics of screen notes. While this tutorial will show you the advanced techniques you can use while working with on-screen notes.
![]()
Step 1. Run HyperCam if it is not yet running, or switch to its window if it is, then open the Screen notes section.
Step 2. We will create 3 different notes for this tutorial. Click the Add button ![]() to create the first one, then select it in the list and right mouse click, select Settings. The screen note setup window opens:
to create the first one, then select it in the list and right mouse click, select Settings. The screen note setup window opens:
Step 3. Type "I am the bottom note" in the text box (1). This will be the text of our first note. Then, check the options (2) and (3). Note: you need this option if you are to use the Pan Lock feature.
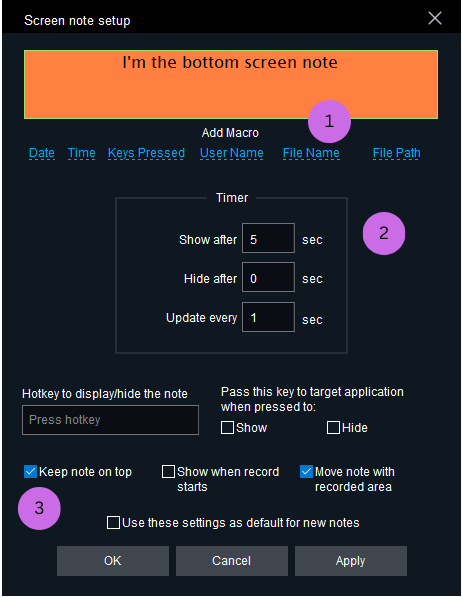
Step 4. Now set the timing for this note. We want it to appear on 5th second of the video. Note: you can use fractions here too.
Step 5. The "Update every" option sets how frequent a note should update its contents. In our case this option is not used, since the text of the note is not changed with time. But we'll need this option further down.
Step 6. Adjust the size and color of the note if you wish and click the OK button to save it.
Step 7. Now click the Add button ![]() again to create the second note, then click the right mouse button, then Settings and set note's parameters as shown on the picture.
again to create the second note, then click the right mouse button, then Settings and set note's parameters as shown on the picture.

Step 8. Type the text into (1), turn on (3) and enter "7" into (2). With these settings, the note will appear right after a record starts and will hide automatically after 7 seconds.
Step 9. Adjust the size, the position and the visuals of this note and save it with the OK button.
Step 10. Finally, let's create the third note. This note uses a macro string in its text. A macro string is a special text that is replaced to some specific value in real-time, that is, while the video is being actually recorded.
Type the text into the text box and use the macro drop-down (1) to select the Time macro.
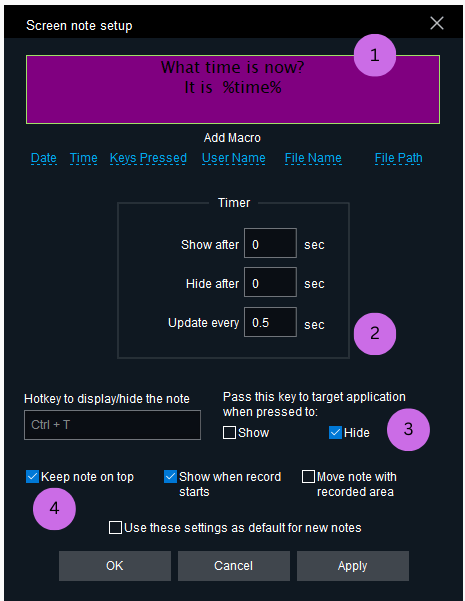
Step 11. Now type 0.5 to the "Update every" field (2). This will make our note to update twice a second.
Step 12. Also, we will setup a hotkey, just to have a way to turn this note off. Set Ctrl + T as a hotkey and turn on the Hide option (3).
Step 13. Click the OK button to save settings and start the recording!
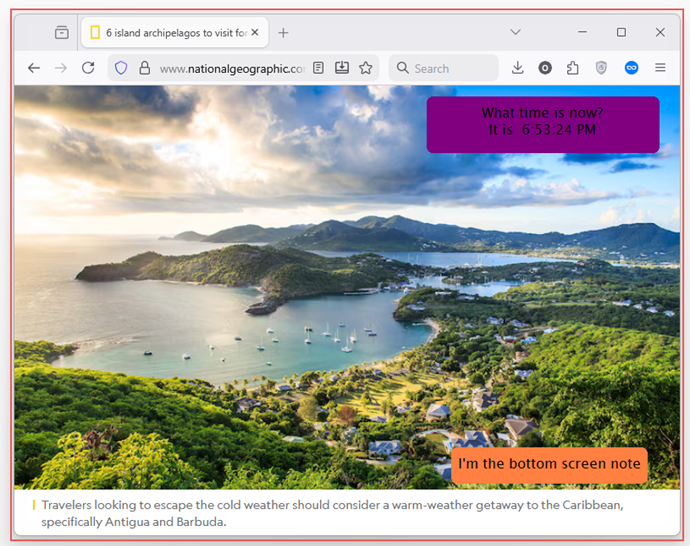
Step 14. As you can see, all of our notes are in place and are working as we planned. Good job!
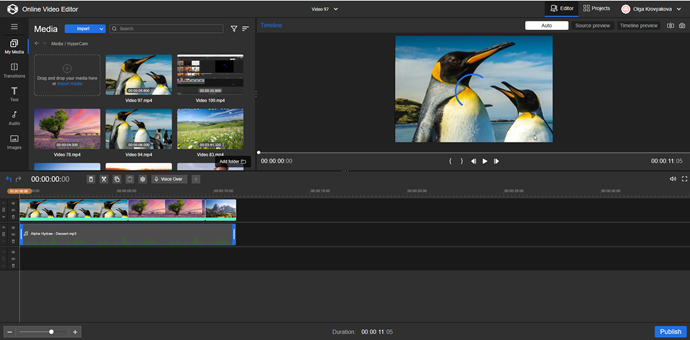
How to Edit Your Video
After recording your screen video you may need to edit it, that is cut off the unnecessary parts, combine two videos into one, or split one video into several smaller media files.
Starting version 7 of HyperCam it is possible to edit your recording with desktop built-in HyperCam Media Editor or with in your browser with Online Video Editor.
This small tutorial aims to introduce you HyperCam Media Editor.
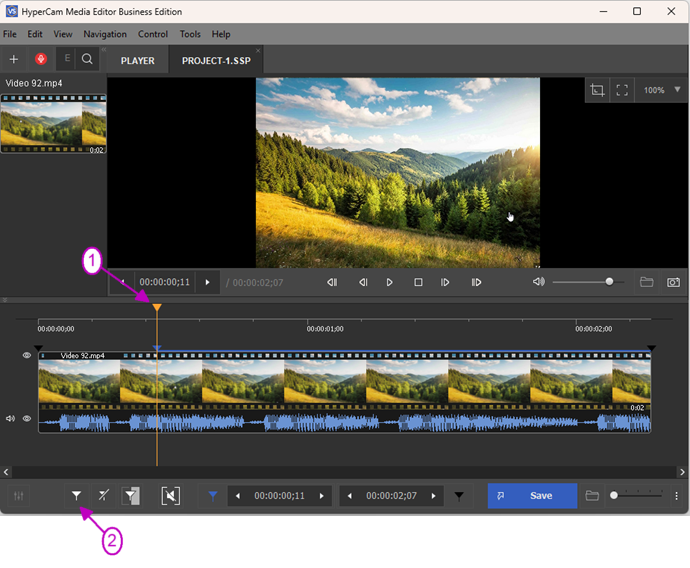
Step 1. First, you need to record a screen video with HyperCam. Let's suppose, you have already done this. Now, to edit your video, select your video file in HyperCam Records section and click the "Trim with installed HC Media Editor" button. HyperCam Media Editor should run with your video already opened.
Step 2. For this example, let's suppose we want to trim the fragment at the beginning and at the end of the video. To set the desired fragment you should use markers. Markers are displayed as small triangles in the timeline bar.
Step 3. Move the slider to the end of the first fragment and click the Add Marker button.
Step 4. Move the slider to the beginning of the last fragment and click the Add Marker button again.
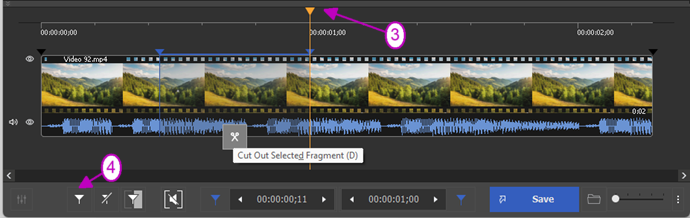
Step 5. Move the mouse cursor to the area between the markers of the first fragment and click the "scissors" button that will arise under the fragment.
The fragment will be marked as cutted out.
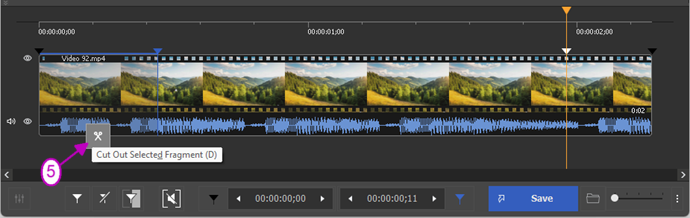
Step 6. Mark the same way the second fagment at the end of the recorded file and click the "Save" button to start the editing.
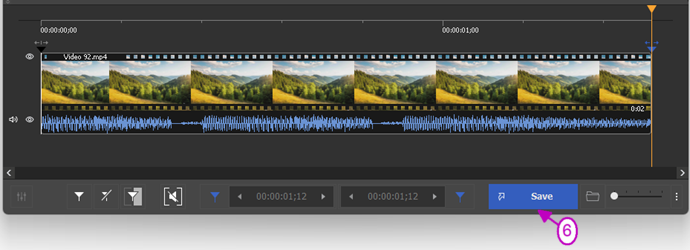
Step 7. Enter the desired name of the file and proceed with saving. Congratulations! You have edited your first video!
Files sharing
Since HyperCam 7 it is possible to share the recorded file with anyone: your family, friends, collegues or clients.
Follow the steps below to share the file.
1) Record your video or audio file as it is described here.
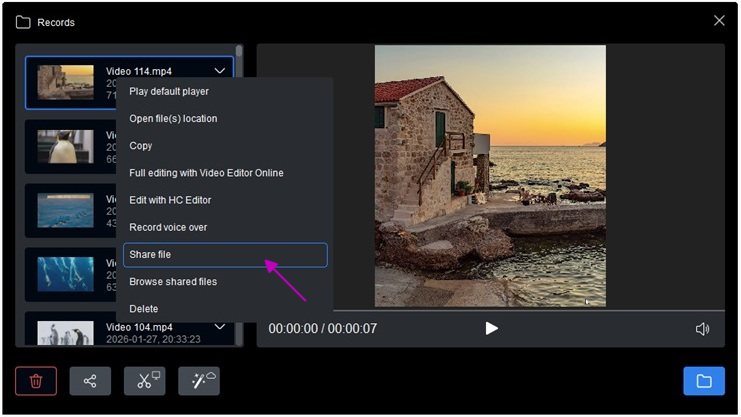
2) When the recording will be completed, the "Records" window will be opened.
3) Click on the "Share file" button (![]() ) to start uploading your file to the server.
) to start uploading your file to the server.
You can also right mouse click on any file on the left in the list of files and click the Share menu.
Wait for some time. You will see the following window.
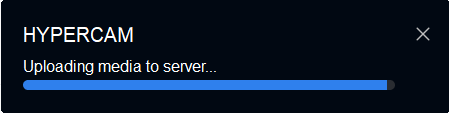
When the uploading will be completed, you will see the appropriate notification.
The link to file is already copied to your clipboard. Press Ctrl+V to paste your link anywhere.
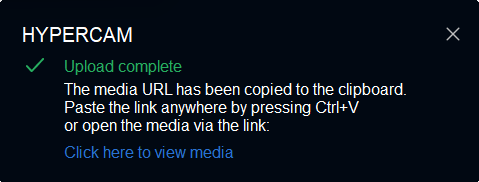
You can also click on the "Click here to view media" to open your uploaded file in the browser.
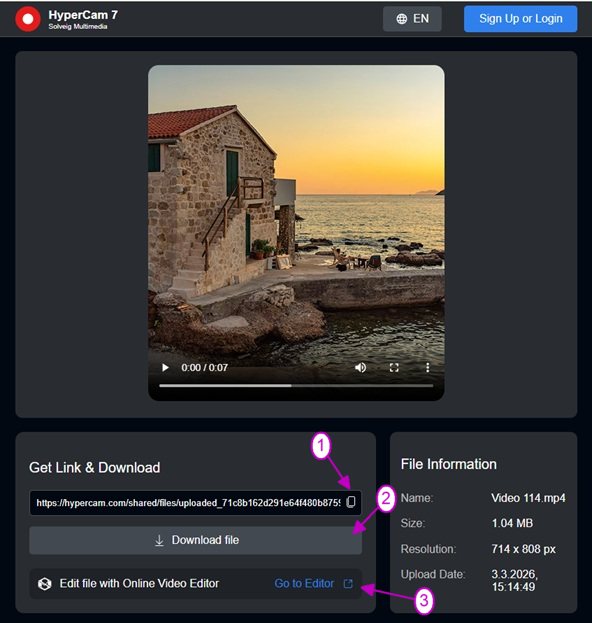
You will see the following window. Here you can copy your link (1), download your file (2), edit it with Online Video Editor (3).
Also you will see here corresponding information about your file, such as its name, size, resolution, upload date.
After uploading the file to the server, you can always get back to the information about the file link for sharing the following way:
1) Go to the Records window from the main window of HyperCam.
2) In the Records window select the file in the list of recordings, right mouse click on it and choose "Browse shared files" menu.
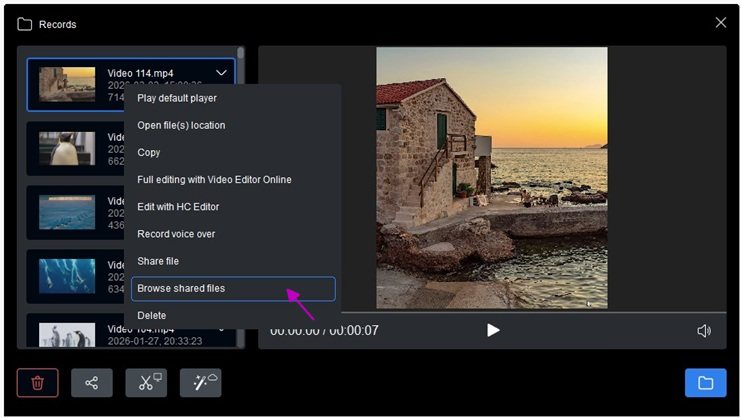
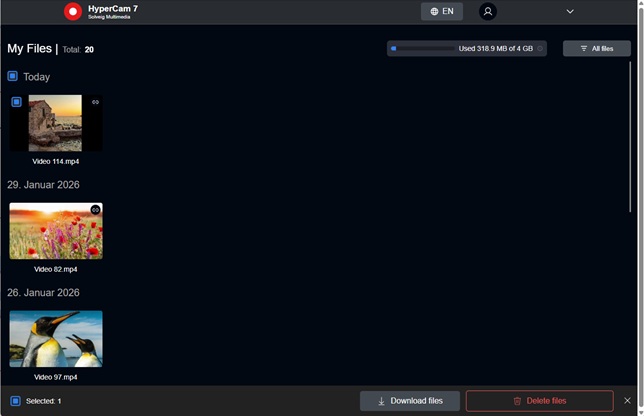
3) Your browser with the list of all uploaded files will be opened.
You can select here any of your files, the bottom line with additional actions to "Download" and "Delete files" will appear.
Configuring HyperCam
Here is a description of the HyperCam settings.
Video tab
This tab contains the following options:
- Screen capture rate (fps) - this option sets how many frames per second will be recorded in a video. The higher this value is, the higher will be the quality of the output video. However, too high values may lead to encoding problems if your system is not fast enough.
Note, you can set different frame rate values for the recording and for the playback. This allows you to increase or decrease the playback speed, but the sound won't be recorded in this case. To increase the playback speed, set the playback frame rate higher than that of recording. To decrease it - set it lower.
- Recording video compressor - this list allows you to choose a codec to record your video and configure its settings if needed. A codec (COder-DECoder) is a software that performs the compression, encoding and playback of a video.
- Key frame distance. This option determines how often full frames are written to the output file. The frames between them may have only the differences between the current and preceding frame. Higher values may let you help to achieve slightly better frame rates, but also can make it difficult to edit your AVI file in a video editor at a later time. It also increases the size of the output file.
- Output file. This is where your recorded videos are saved.
- Output format. You can select here the desired output format in MP4 (by default), AVI, WMV or ASF.
Audio tab
This tab allows you to adjust the audio recording settings.
- Device - select an audio device to record the audio with. Usually, it is your audio card, either internal or external or microphone.
- Source - you can select here, the source to record the audio from. This could be a microphone input, or headset etc. You can also choose the "Stereo mix" option to tell HyperCam to record all input audio that you hear from your speakers.
- The recording Audio Compressor combobox allows you to select an audio codec. By default it is FFmpeg MP3.
- Output file. This is where your recorded audios are saved.
- Output format. You can select here the desired output format in MP3 (by default), WAV, WMA or M4A.
Extras tab
- MP4 safe recording mode. This option enables recording recovery after unexpected termination of the program for MP4 output format.
- Use Desktop Duplication API (win8+). This option improves speed of capturing screen via Desktop Duplication API (available in Windows 8 or higher) and allows to make capture with higher fps values.
- Capture layered windows. This option enabled the capture of semi-transparent windows.
- Capture mouse cursor. Turn this option on if you want your mouse cursor to appear in your video.
- Capture overlay. This option allows recording of the screen area from some video players and other applications.
- Write logs. Allows enabling log files recording. You can select here also the output folder to save log files.
- Add starburst on click. It is easy to miss a mouse click while watching a video. It may be crucial if you're recording some video tutorial or how-to. HyperCam 6 can add a little starburst whenever you click a mouse button. Turn this option on to enable it and set the size and the color of the startburst to make it fit your video best of all.
- Mouse click sound volume speaks for itself. This option requires audio recording to be enabled.
- Renderer for video preview. This option allows to select video renderer for video preview.
- Settings. This option allows to export and import the settings of HyperCam.
Interface tab
- Show countdown timer. Allows to disable and enable the countdown timer used before recording starts.
- HyperCam language. Allows to select the interface language.
Screenshots tab
Output format. Allows to select the format for screenshots: JPEG, PNG or BMP. For JPEG you can also set the output files quality.
Hotkeys
- Hotkeys to start/stop/pause recording. Allows to set hotkeys for main operations.
- Pan the captured area when a mouse moving and the following keys are pressed. Configure the way to use the Pan Lock feature.
Configuring Screen Notes
Here are the options you can use to configure screen notes.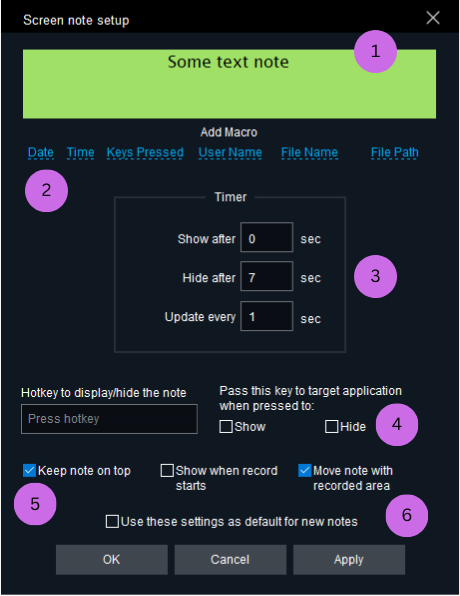
- This is the text area. Type the text of a screen note here.
- This option pastes a macro string into the text of the note. At this time the following macros are supported:
%time% inserts the current time. Please note, you need to set the "Update every" option to some non-zero value if you want this macros to be updated.
%date% inserts the current date.
%key% inserts into the text of a note the current key stroke pressed. For instance, if while recording a video you press Ctrl + W, this macro displays "Ctrl + W" string. This option is convenient if you want to add comments about the keys you're pressing to your video.
%uname% inserts the name of the current user.
%file% and %path% show the file name and the path to the video being played.
- These input boxes allow you to create a note that displays or hides by timer. You can read more about this capability in this tutorial.
- Define a hotkey that displays or hides a note, or both. You can use any key combinations including Ctrl, Shift or Alt modifier keys.
- These checkboxes define the behavior of a note.
- Check this option to use the current settings as the default template for all new screen notes.
- https://www.solveigmm.com/en/howto/how-to-achieve-a-good-video-quality-using-hypercam/
- https://www.solveigmm.com/en/howto/how-to-record-a-skype-session-with-hypercam/
 Olga Krovyakova is the Technical Support Manager in Solveig Multimedia.
She is the author of many text and video guidelines of company's products: Video Splitter, HyperCam, WMP Trimmer Plugin, AVI Trimmer+ and TriMP4.
She works with programs every day and therefore knows very well how they work. Сontact Olga via support@solveigmm.com if you have any questions. She will gladly assist you!